
Objective
To detail all the main settings required to use the Supplies module in NDD Print MPS.
Guide
To understand the workflow, we first need to understand a few terms:
Forecasting: In MPS, forecasting refers to planning how much of each item (supply) needs to be sent to replenish stock over a given period of time. In other words, it involves defining in advance the replenishment quantity needed to prevent shortages of materials or products.
Replenishment items: These are the supplies used to replace those that are running low in a printer, ensuring that it continues to print.
Safety stock items: These are supplies kept in stock as a general reserve, not assigned to a specific printer. They serve as extra protection to prevent material shortages in unexpected situations.
-
Safety stock items are defined between the provider and the customer
-
Not all stocks replenish safety stock items
-
When calculating the forecast, the maximum safety stock level configured to replenish stock is always taken into account
Note:
Before making any manual changes, verify whether the company uses any automatic integrations with the MPS system via APIs. If in doubt, consult the person responsible for the integration or assess the scope of the configuration before proceeding with any manual changes.
Creating Sites
Sites are logical units of a company, and through them it is possible to represent the company’s branches, agencies, locations, or units within the NDD Print MPS system. Sites should be created with the appropriate characteristics and information for each location.
The required information is:
-
Site Name;
-
Initial and Final IP Ranges with Subnet;
-
Location Data (State, City, Street, Number, Neighborhood, ZIP Code, Additional Information).
The path to access the sites is:
-
Go to the Companies menu
-
Select the desired company
-
Click Properties
-
In the company record, go to the Sites tab
-
Click New to create a site and fill in the necessary information

For more details on this configuration, simply access the manual by clicking here.
Configuring the Relationship Between Printers and Sites
After creating the Site, you must associate the printers belonging to that location with it.
To perform the configuration:
-
Click on Site and then Edit
-
Access the Printers tab
-
Click Add Printers
-
A list of all printers identified for the company by NDD Print Host will be displayed
-
Select the printers that belong to this Site and click Save
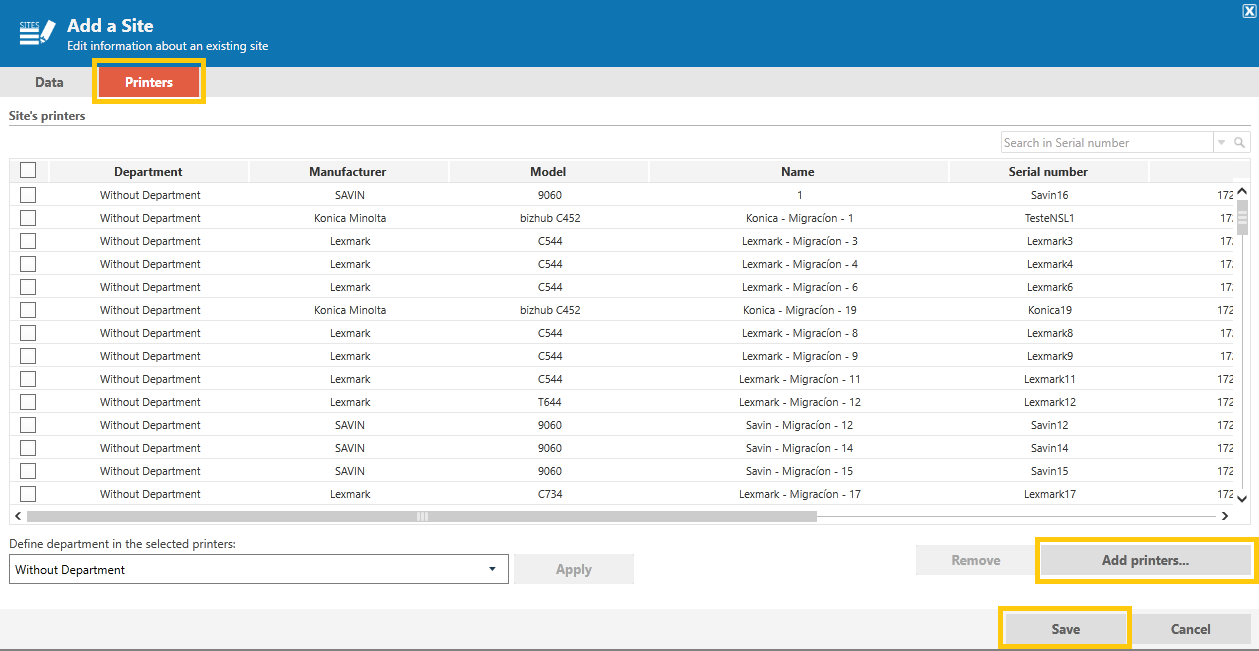
By default, all printers identified by the system are automatically linked to the Default Site. It is up to the provider to organize these printers into the correct Sites, according to the customer’s structure and location.
Example: If the company has a headquarters and two branches, the printers will initially appear in the Default Site. After the Sites are created, the printers must be moved to Headquarters, Branch 1, or Branch 2, depending on their actual location.
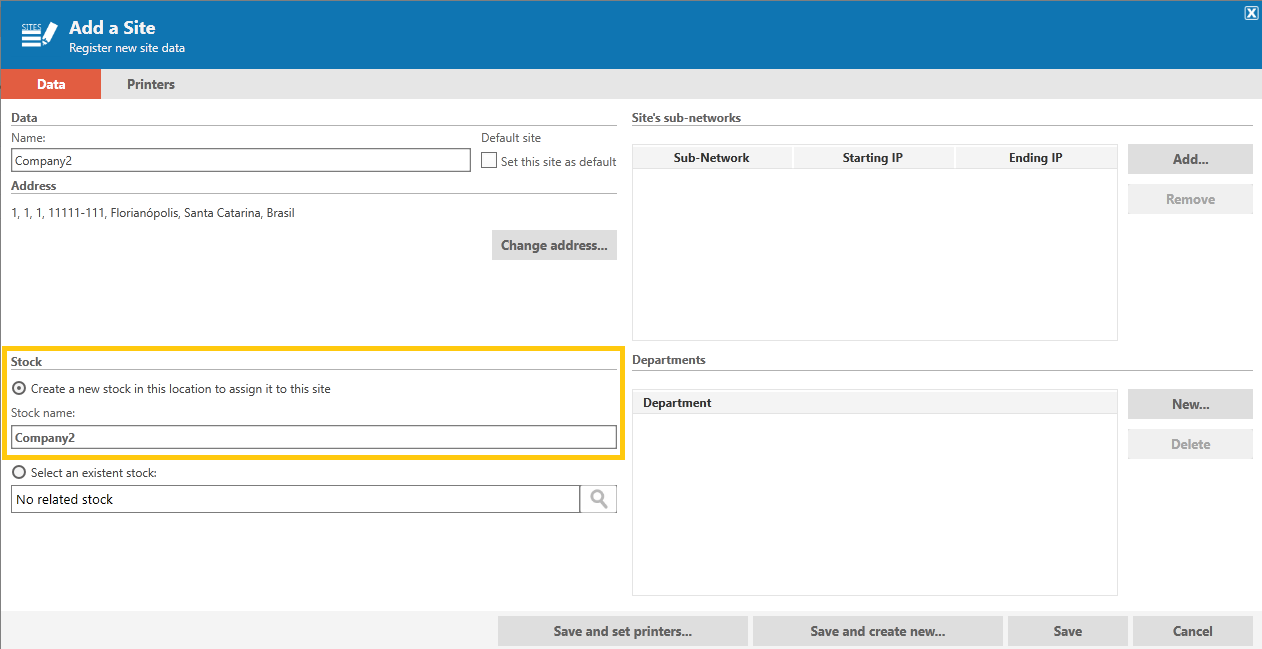
For more details on this configuration, simply access the manual by clicking here.Ao criar um novo Site, você pode optar por criar também um estoque exclusivo para essa localidade.
-
This stock will be used only by this Site.
-
By default, the stock will be given the same name as the Site that was created.
-
The name can be changed during registration, if necessary.
Example:
If the “Company01 – BRANCH 2” site is created, a stock item named “Company01 – BRANCH 2” may be automatically created to serve only that location.
Creating Customer Stocks
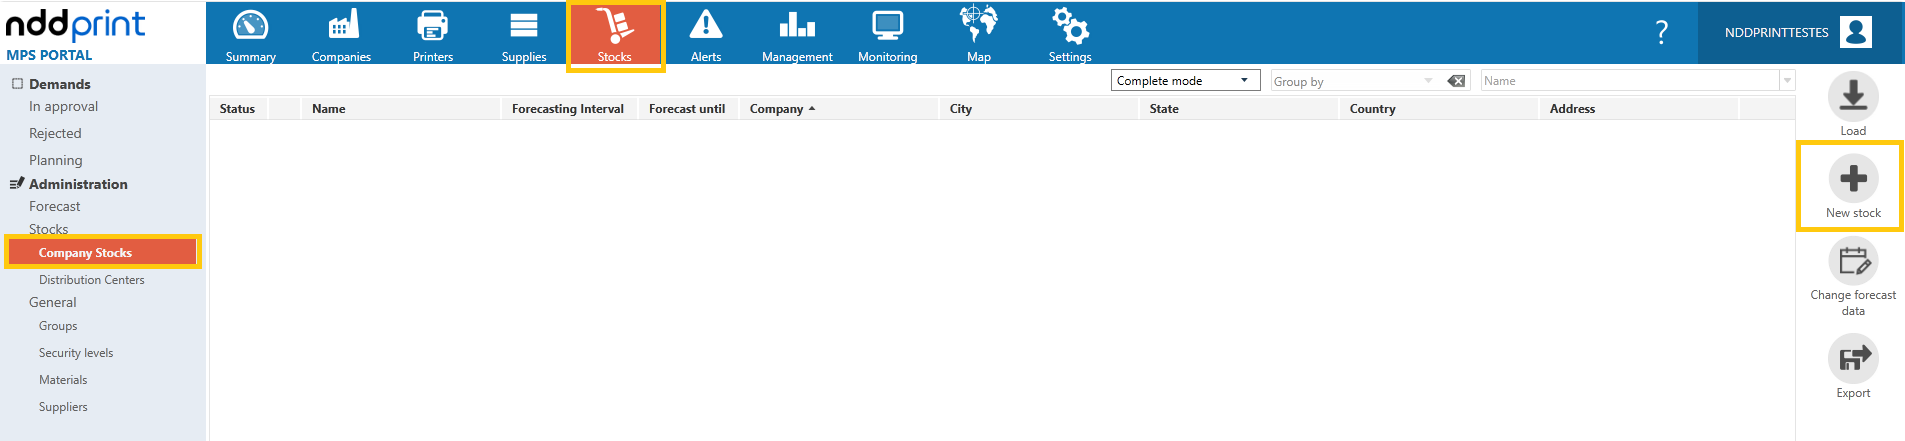
Stocks are logical representations within the system that accurately reflect the physical storage locations of items (supplies). They are used to manage and administer physical stocks, covering all operations related to that stock.
Generally, the stock is already created when the site is set up. If you need to register another EC, go to Stocks > Company Stocks > New Stock.
For more details on this configuration, simply access the manual by clicking here.
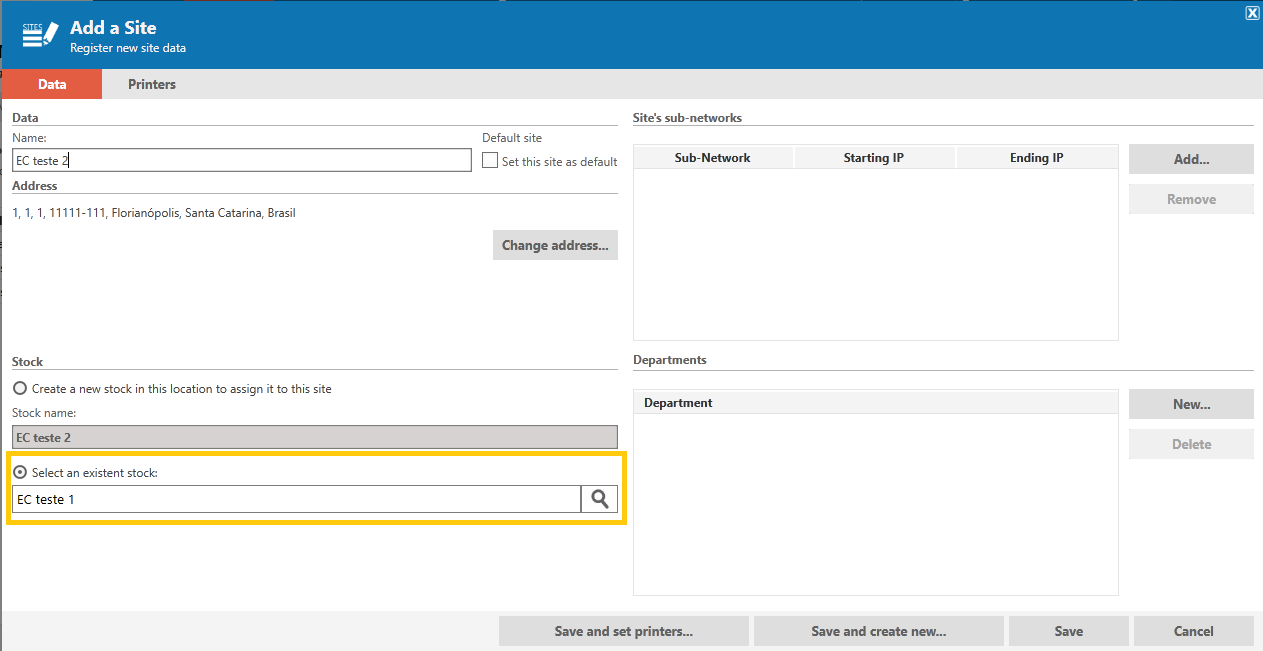
You can also select a stock that is already registered for the company.
-
A list of available stocks will be displayed.
-
A single stock can be used to supply multiple sites.
-
This option is recommended when supplies are centralized.
Example:
The stock located at the corporate headquarters may be responsible for supplying all of the company's branches.
Supplier Setup
The Supplier is responsible for sending replenishment supplies to the customer’s stock, such as toner, cartridges, and other consumables. In the MPS system, you can register one or more suppliers if the customer receives supplies from different suppliers.
Example
A customer may receive toner cartridges from one main supplier and parts for replenishment from another. In this case, both can be registered in the system to facilitate the tracking and monitoring of shipments.
To register a new supplier in the system:
-
Access the Stocks menu
-
Click Suppliers
-
Select the New Supplier option
-
Enter the requested supplier information.
After registration, the supplier will be available to be associated with inventory items and used in the supplies replenishment processes.
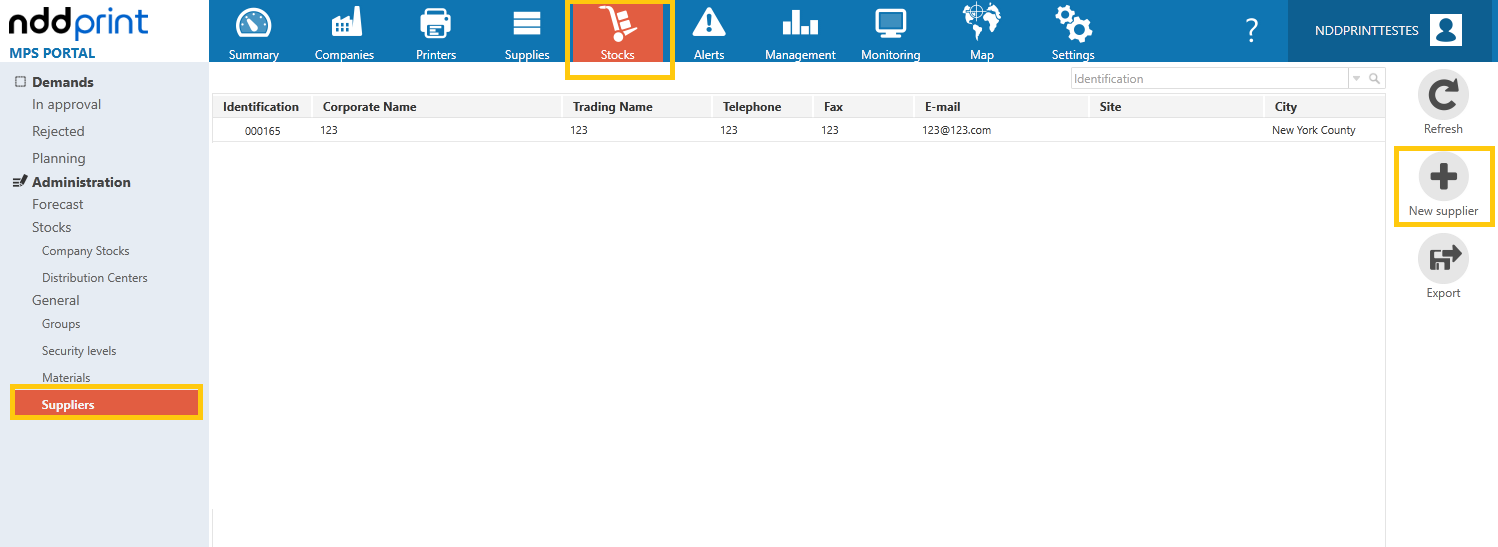
For more details on this configuration, simply access the manual by clicking here.
Additional Supplier Settings
Relate Customer Inventory to Supplier
After registering the supplier, you must specify which stocks the supplier will be responsible for restocking. Each new stock item created must be linked to a supplier:
-
Access the supplier record
-
Click Supplier Properties
-
Open the Relationships tab
-
Click New
-
Select the stocks that will be supplied by this supplier and assign the responsible users
-
Specify the replenishment lead time
-
Replenishment time is the period between identifying the need for a supply and its delivery to the customer's stock. This information helps the system schedule shipments and prevent material shortages.
-
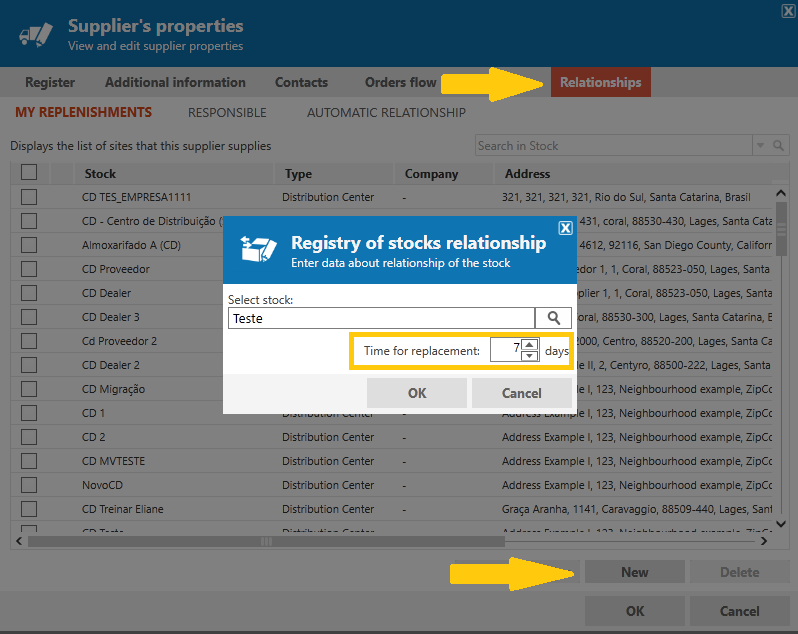
For more details on this configuration, simply access the manual by clicking here.
Set Users Responsible for Customer Inventory and Demand Planning
In the supplier's properties, go to the Responsible Users tab to define which users can request stock replenishments through this supplier. Only users registered as responsible will be allowed to create and manage replenishment requests related to this supplier.
-
Access the supplier’s record
-
Click Properties
-
Open the Relationship tab
-
Click Responsible
-
Click New and assign the responsible users
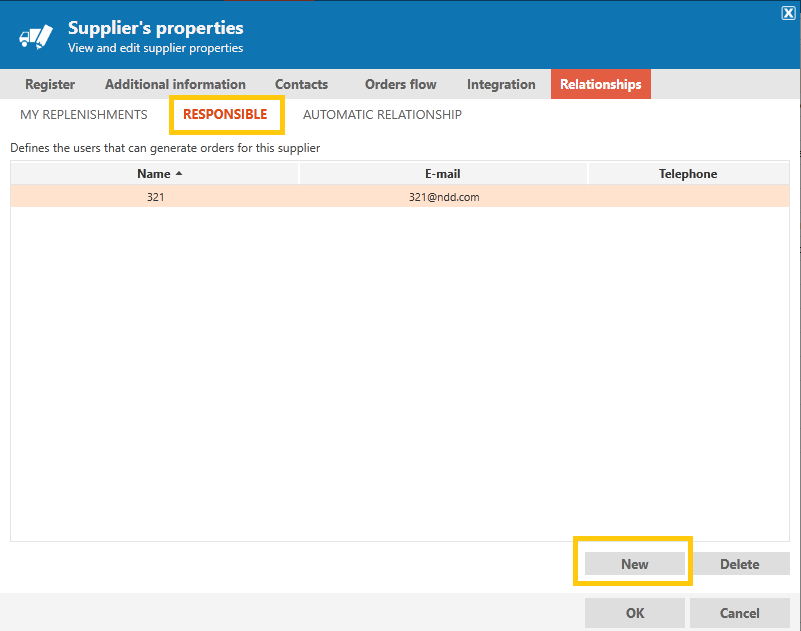
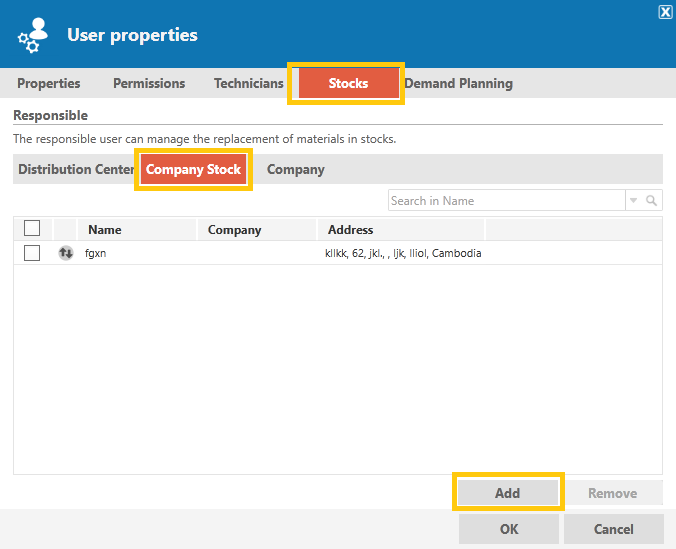
In the properties of the user added as the person in charge, you must add full permissions for the new stock. To do this, go to the Settings tab on the main page > Users > Select the user > User Properties > Permissions tab.
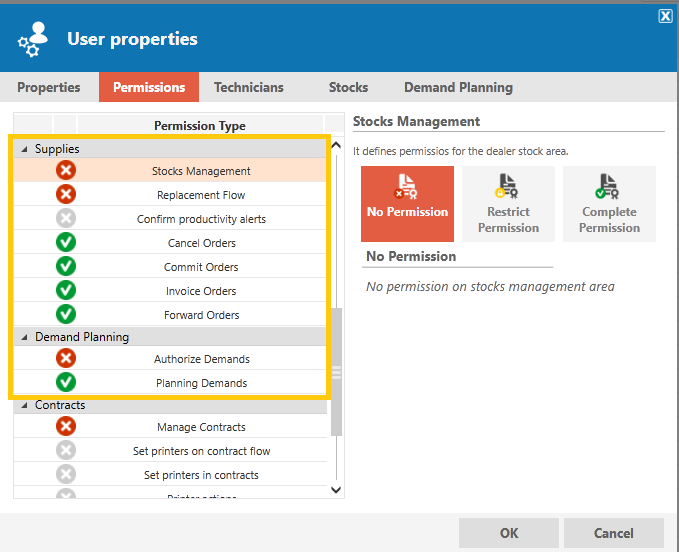
Then access Stocks > Company Stock > Add.
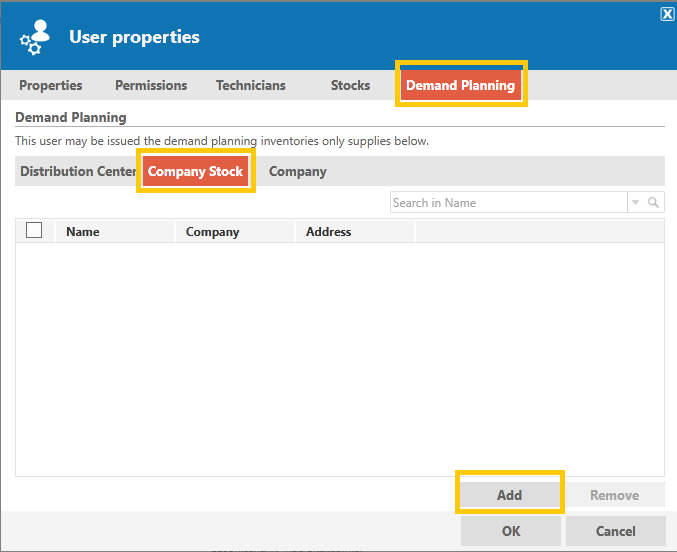
Access Stocks > Demand Planning > Company Stock > Add.
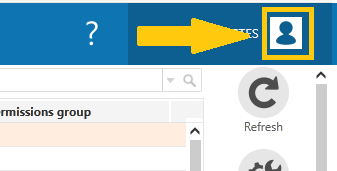
User properties can be accessed in the upper-right corner of the system:
For more details on this configuration, simply access the manual by clicking here.
Material Registration
You must verify the printer models already registered for the customer where the stock operation will begin.
If any printer has a supply in use without information such as Part Number or Supply Capacity, you will need to enter this data into the system. This information is important because the system uses it to correctly calculate the consumption and lifespan of the supplies.
Some printers do not automatically send this information, so it must be entered manually into the system to avoid calculation errors.
MPS has an internal knowledge base (KB) listing compatible supplies for each printer model. Before registering any supplies, the first step is to verify that the correct supply is already linked to the printer.
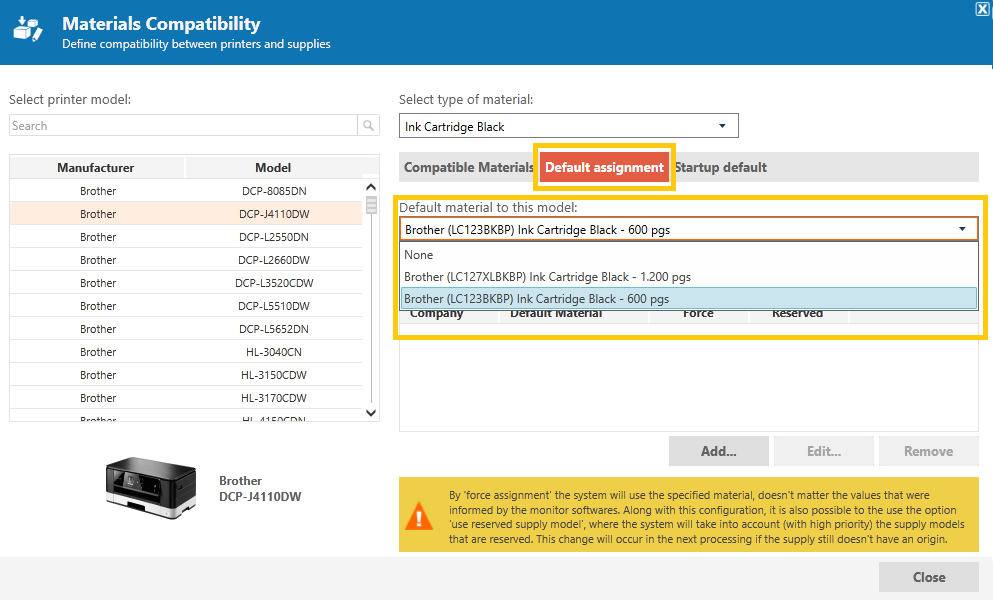
To check this, follow this path: Stock > Materials > Compatibility > Find the printer in question .
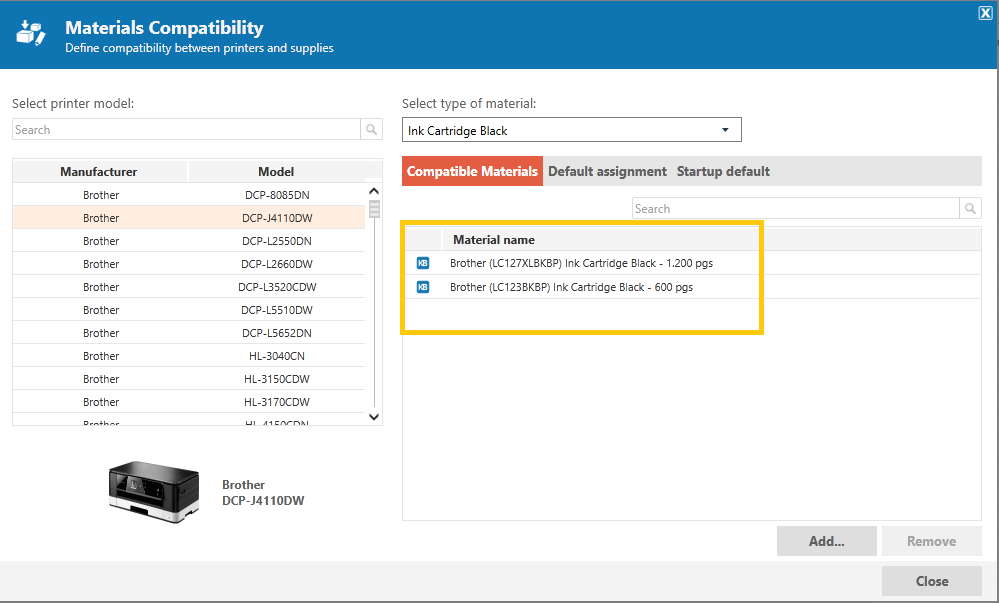
If the material used in the printer is on the list, you should select it as the Assignment Default; this configuration ensures that all supplies added to the printer in question will be assigned to it, if possible.
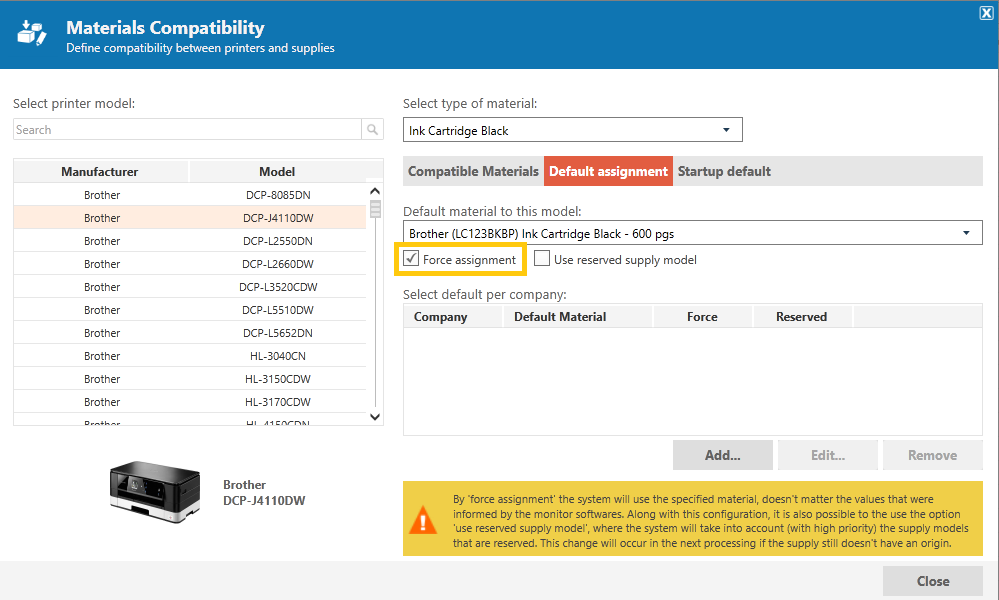
If the material in question does not include part number and Capacity information, you can still force the default assignment rule so that all exchanged supplies are assigned to the specified model. To do this, simply access the same screen mentioned above and select the Force Assignment option.
If the material you want to use is not on the list, go back to the previous screen and create a new material. Once you've done that, add it to the model's compatibility settings and finally force the assignment.
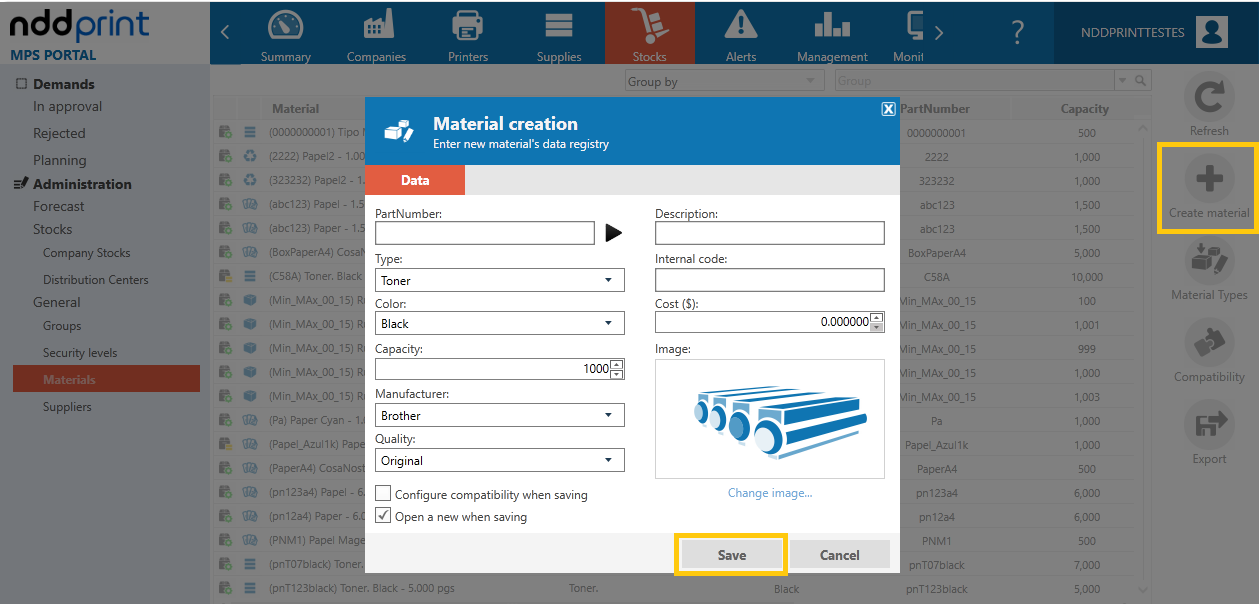
After creating the document, go back to the Compatibility tab and set it to be compatible with the printer model in question.
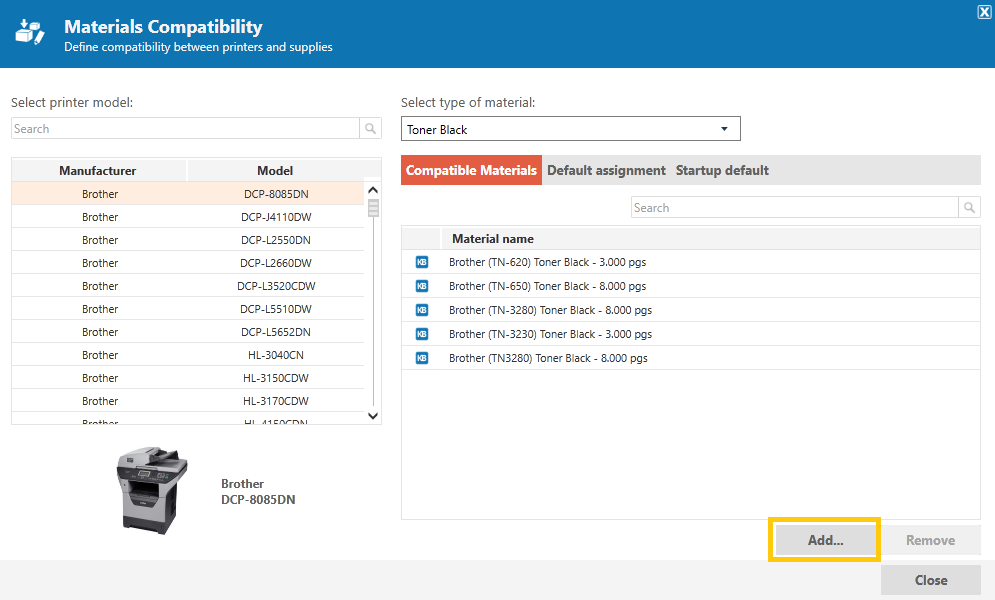
Finally, you must assign the material as the Default Assignment or Force Assignment, as mentioned earlier.
Adjusting Safety Stock Levels
Safety stock levels are used to regulate the safety stock for the location in question; therefore, these levels should be configured according to the minimum and maximum safety stock levels desired in each case. These level settings are optional and are not required for using the system.
The first step is to open the customer’s inventory you are working on (Inventories > Customer Inventories) and click on Level Configuration. Finally, select and add the items to be included in the initial level, defining their safety stock level (if applicable).
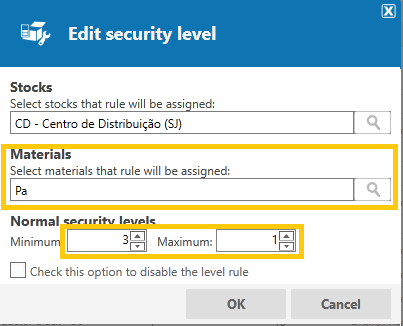
For more details on this configuration, simply access the manual by clicking here.
Stock Adjustments
Before you begin configuring stock and performing the initial level of material upload, it is important to check the alerts generated in the system that appear as “unknown origin.”
At this early stage, before the initial level of stock upload and the start of operations, these alerts can be safely ignored.
Ignoring alerts with no origin is only applicable during the configuration phase. Once operations begin, these alerts should no longer be ignored and must be analyzed and processed properly.
To ignore alerts with no origin, the user must have administrator permissions in the system.
-
Go to the Supplies menu
-
Click Alerts > No Origin
-
Select the Ignore Origins option
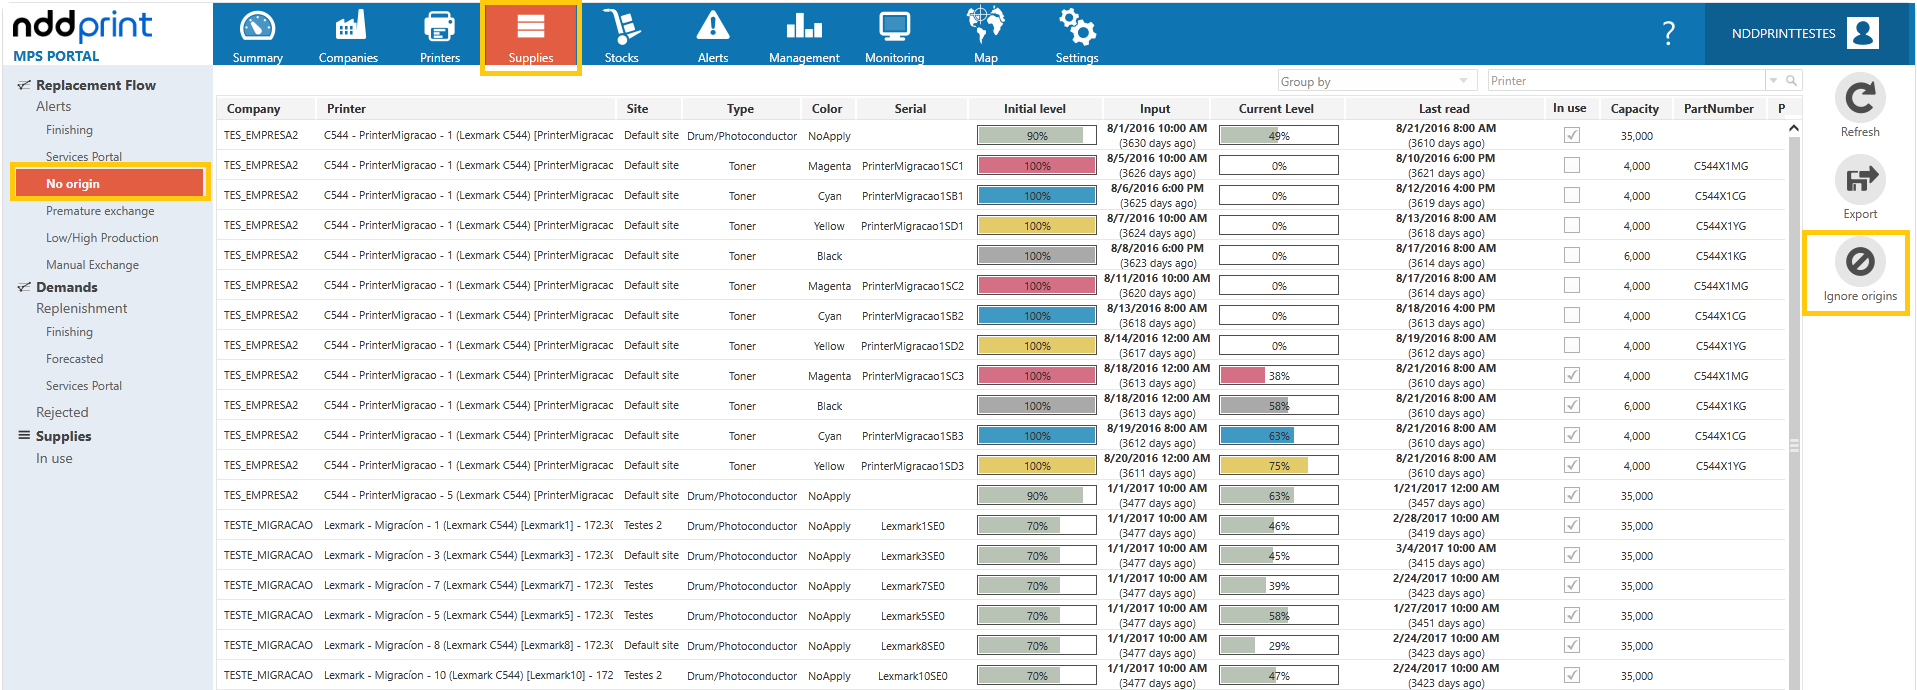
-
On the screen that opens, move the companies for which alerts should be ignored to the right-hand column.
-
Then, check the option Also ignore the origin of supplies in use
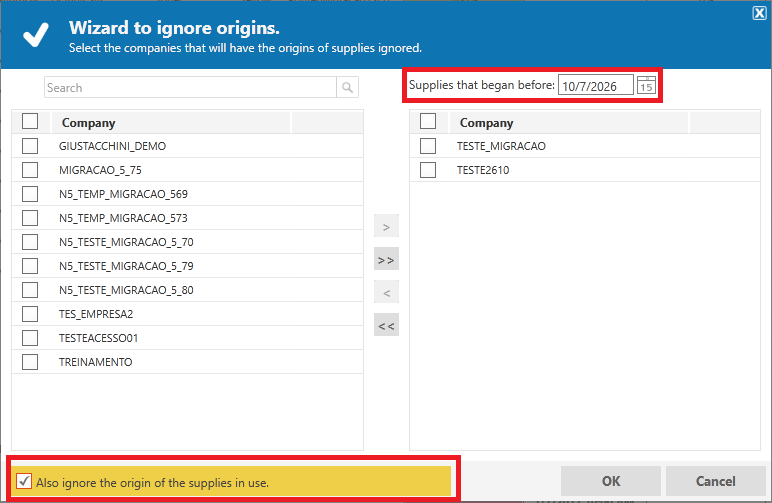
Initial Level of Stock in Customer Inventories
To begin using the system for supplies management, it is essential to enter the quantity of stock physically allocated to each customer inventory in NDD Print MPS.
Register Materials to Be Stocked
To register the materials to be stocked, follow the steps below:
-
Go to the Inventories menu.
-
Click Company Stock
-
Select the desired inventory.
-
Open the Inventory Properties
-
Go to the Materials List menu
-
On the right side of the screen, click Level Configuration
-
Select all the materials that will be stocked in this inventory.
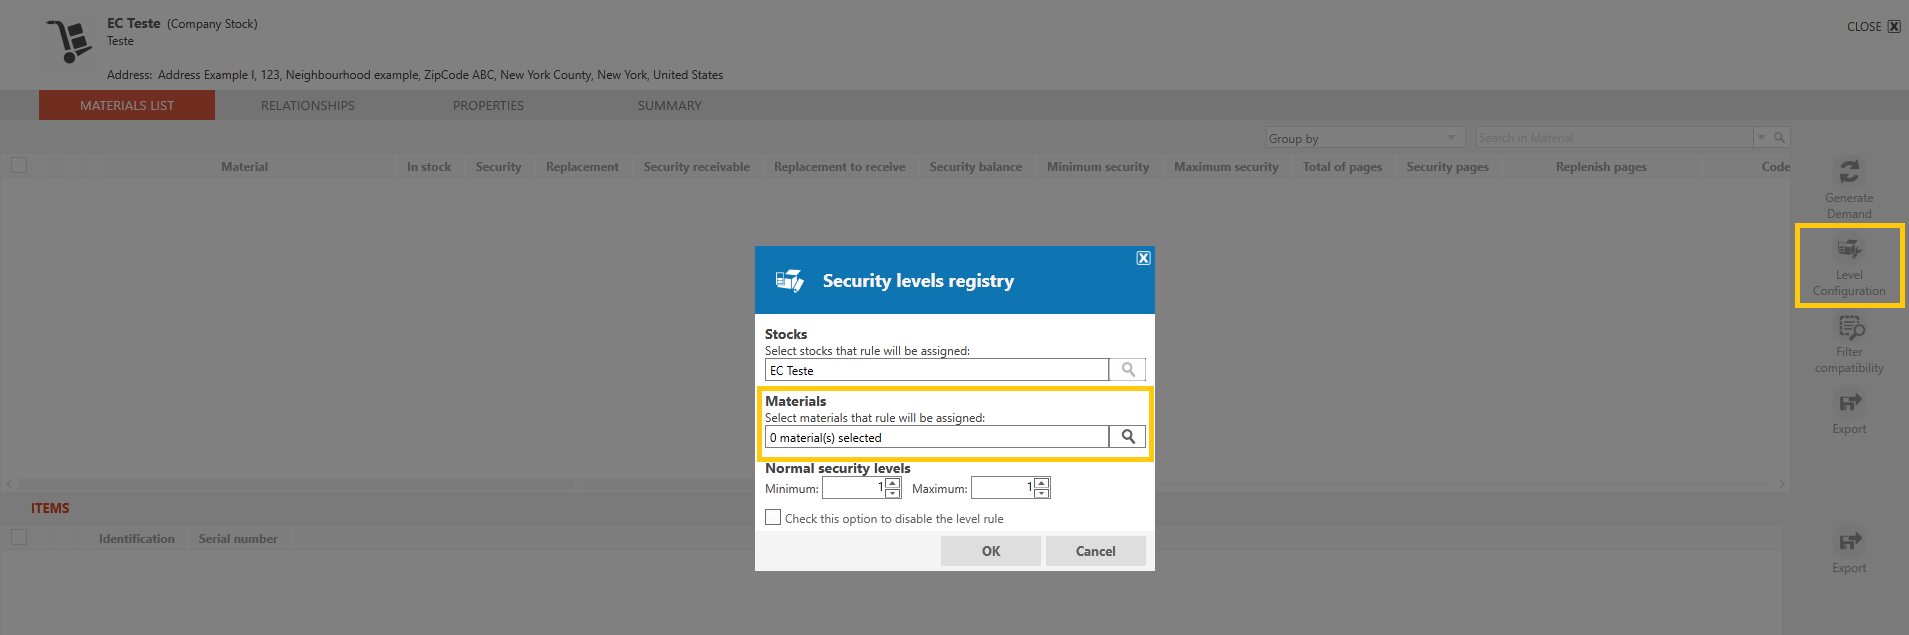
For more details on this configuration, simply access the manual by clicking here.
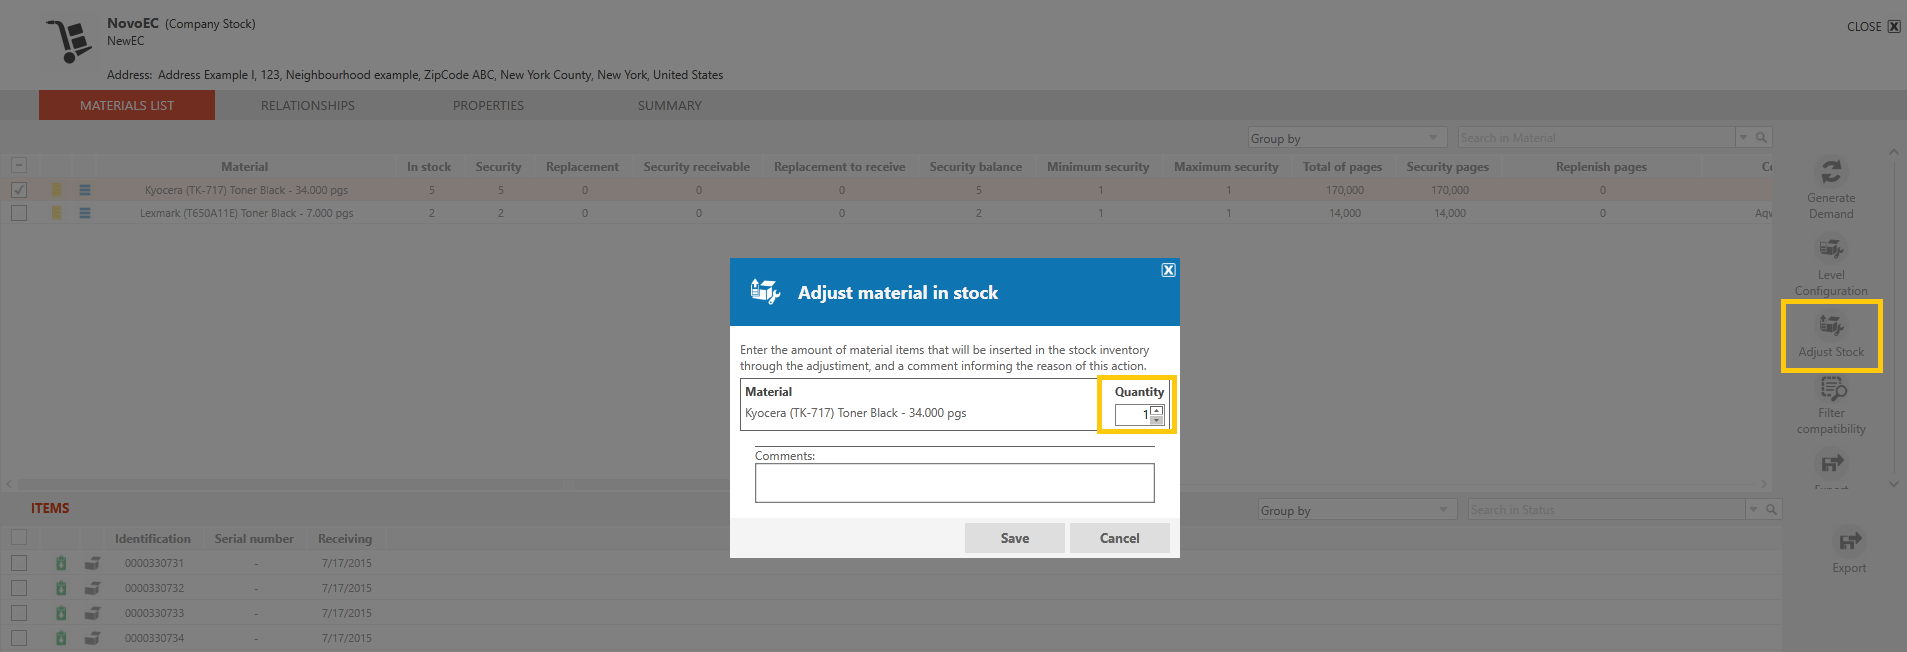
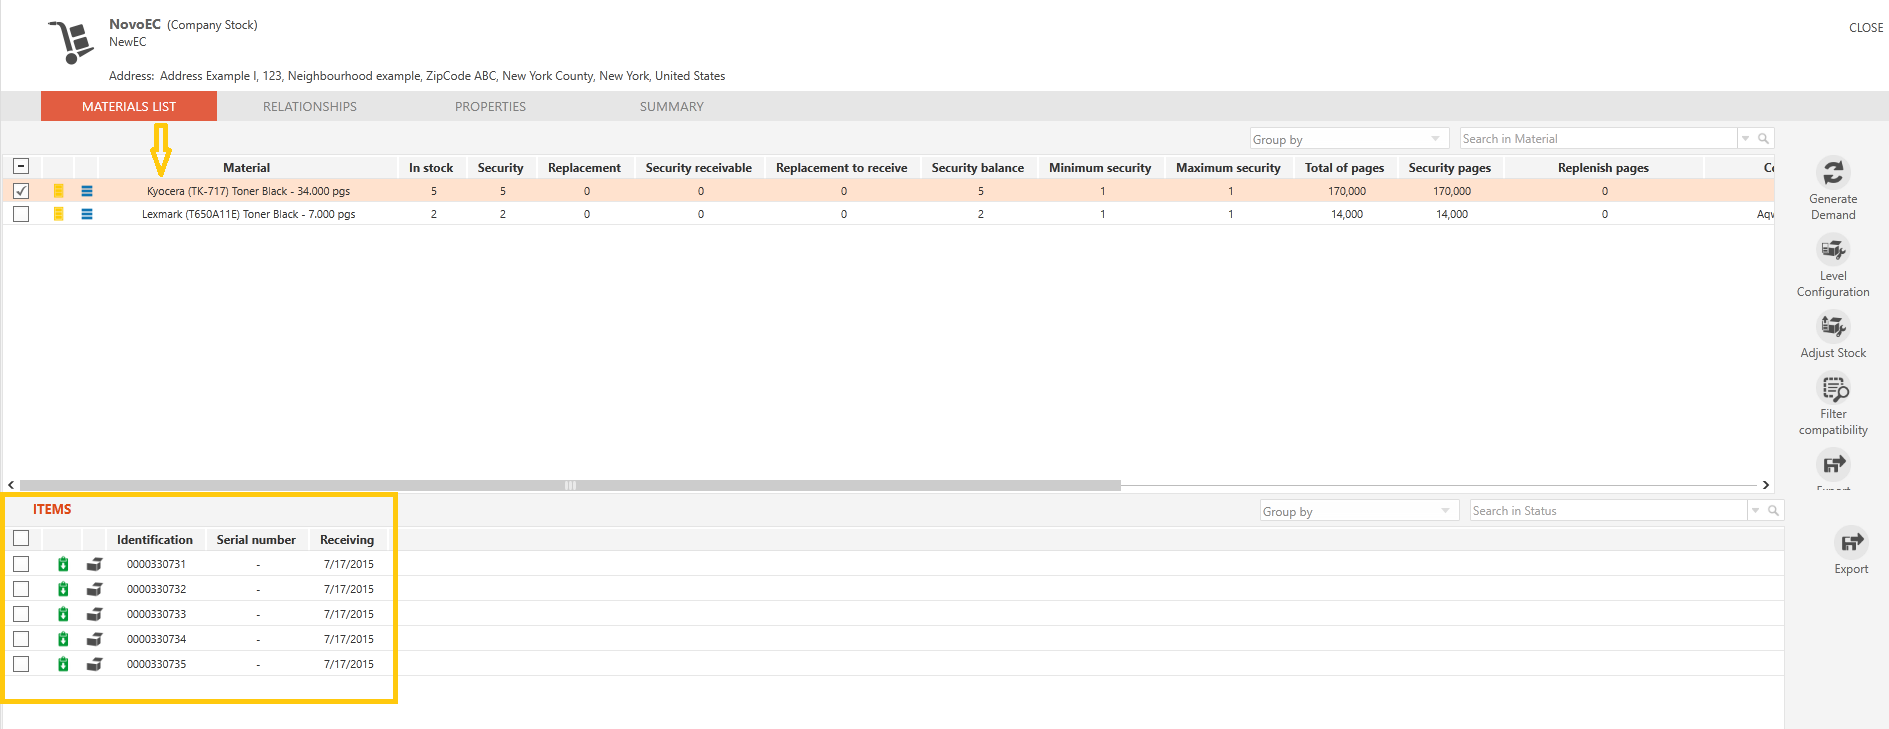
Adjust the physical quantity of materials in the system
To adjust the physical quantity of materials in the system:
-
In Company Stock, select the material you want to adjust
-
On the right side of the screen, click Adjust Stock
-
Enter the physical quantity of the material available in stock
-
Add a comment describing the reason for the adjustment
Eliminate or Adjust Registered Items
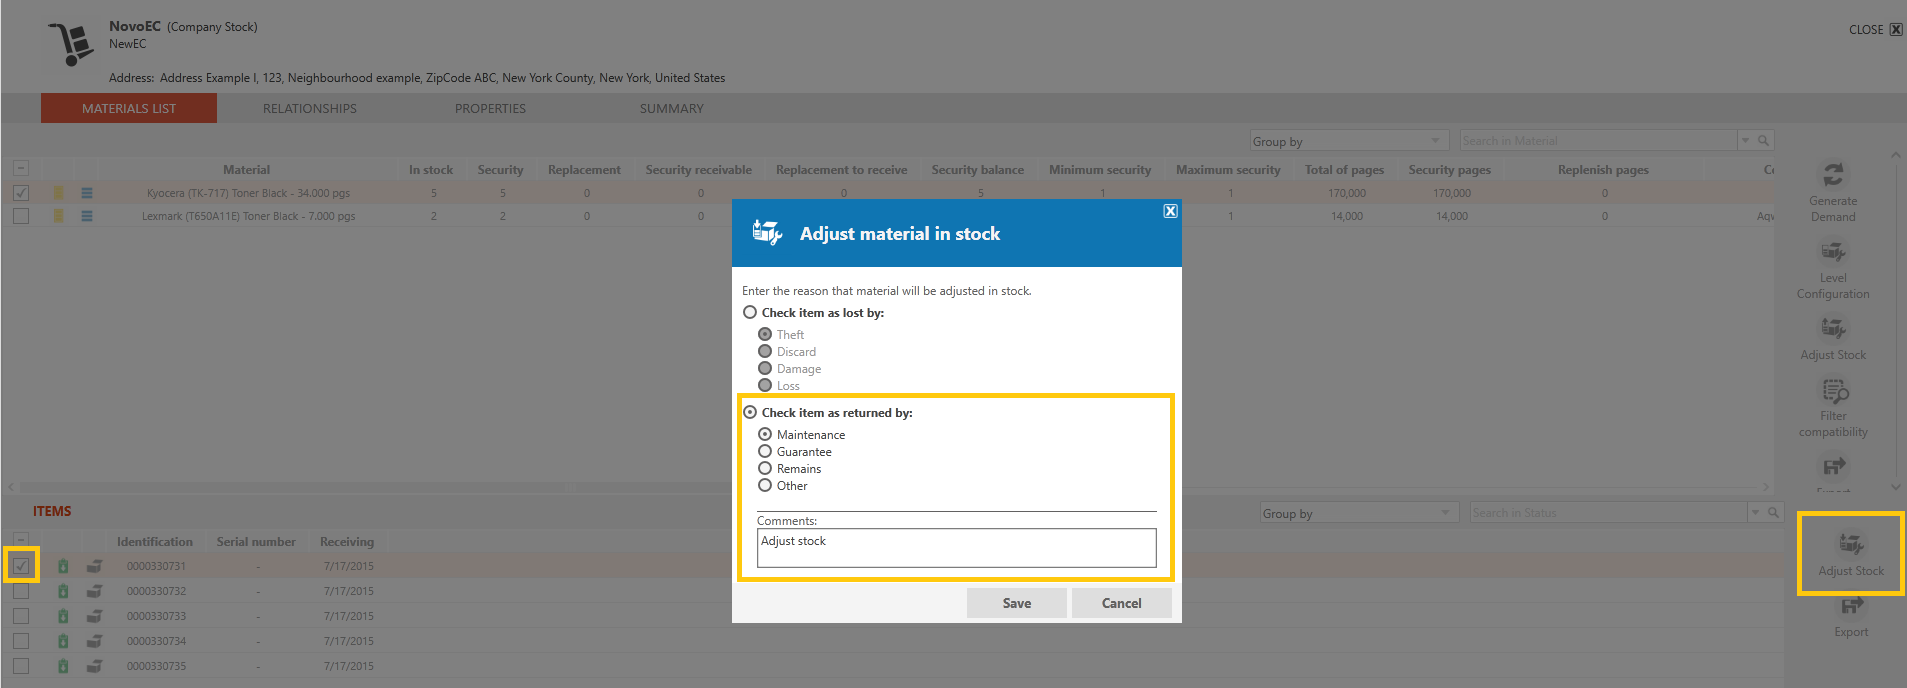
To eliminate items that may have been entered incorrectly, or to make adjustments to inventory:
-
In the customer's inventory, select the quantity of the items you want to adjust
-
In the lower-right corner of the screen, click Adjust Inventory
-
Enter the reason for the adjustment
-
Click Save to complete the adjustment
Companies in the Replenishment Workflow
To prevent supply alerts from being generated for companies that are not in operation—and thus avoid creating unnecessary alerts in the system—we recommend setting the B Include Supplies in the Replenishment WorkflowB rule to false for all companies. As new companies are added to the replenishment workflow, set the rule to true for them.
The path is Settings > Settings > Replacement Flow > Include Supplies in the Replacement Flow:

Para mais detalhes desta configuração, basta acessar o manual clicando aqui.
Rules for Defining Supplies Running Low
As you know, in addition to all the monitoring options in NDD Print MPS, it is also necessary to track the “Supplies Running Low” grids, which display supplies that have reached a certain indicator and for which actions must be taken.
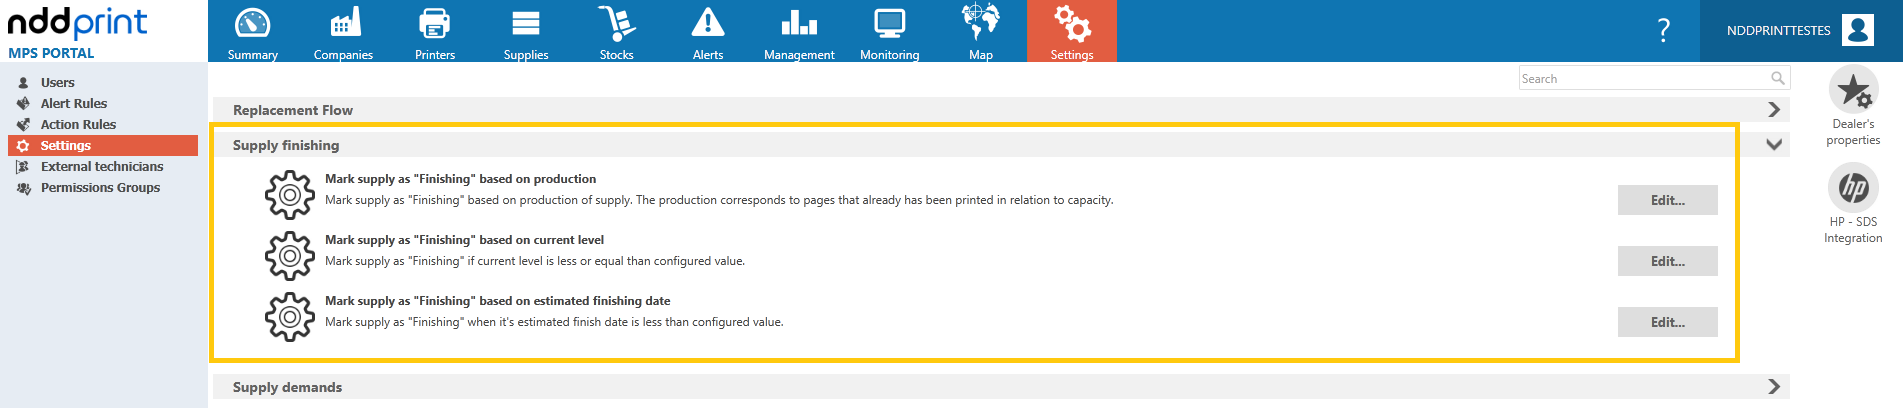
You can configure rules to mark a supply as running low, which are:
-
Based on yield;
-
Based on the current level;
-
Based on the estimated expiration date;
The path is Settings > Settings > Supply as finishing:
For more details on this configuration, simply access the manual by clicking here.
Force Application of Rules
The rules configured in the Rules for Defining Supplies That Are Running Low section of this document will be applied when new supply information is processed for the printer; however, you can force the update using the option available under Settings > Settings > Apply the Settings:
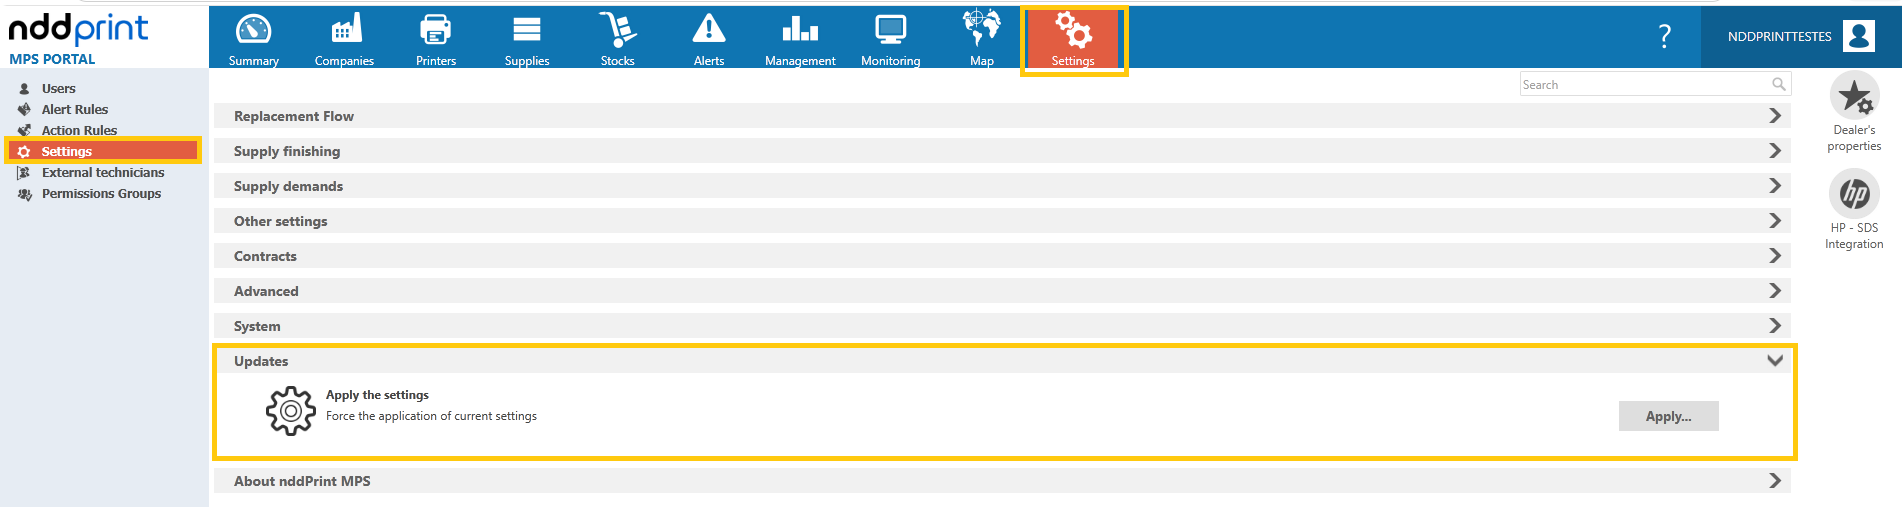
For more details on this configuration, simply access the manual by clicking here.
Frequently Asked Questions
Is it possible to import printers, sites, and customer stocks in bulk?
Yes, if necessary, you can use the GeneralData tool to import printers, sites, and customer stocks in bulk. To access the tool, simply click here.
Can I have more than one registered supplier?
You can have as many suppliers as needed; however, if the supplier is used solely for stock management, it’s best to have only one to simplify operations.
Do I need to configure other rules in the system to use the supplies module?
NDD Print MPS offers a wide range of rules and possibilities that streamline operations; therefore, it is essential that the person responsible for configuring NDD Print MPS assess the need to create additional rules beyond those described in this document.
At what point during configuration is it best to perform stock uploads?
It is recommended that the stock update be the last task before starting the customer’s operation, as this information must be updated in the system when the operation begins.
Can I enter a fictitious stock update or skip this step?
No. The stock entered into the system must reflect the physical stock; otherwise, operational problems will arise.
Is it mandatory to configure the safety stock levels?
No. This configuration is optional, as it will only be used to control safety stock if necessary.
Is it possible to import materials in bulk?
Yes, if necessary, bulk import of materials can be performed using the GeneralData tool. To access the tool, simply click here.
Can a printer be associated with two sites?
No. A printer can be associated with only one site.
Can a customer stock be associated with multiple sites?
Yes. A customer stock can supply more than one site.
Can a site be associated with multiple customer stocks?
No. A site can be supplied by only one customer stock.