
Objective
To detail all the settings required to use the MPS closing module.
Creating a Contract
To begin configuring the settings, you must first create the contract, which is an available option under the Companies > Contracts > New Contract tab.

You must have Manage Contracts permissions.
If you have multiple contracts with the same rules, you may first want to create a default template to apply to multiple contracts; if you do not want to create a template, you can go directly to the Default Template topic.
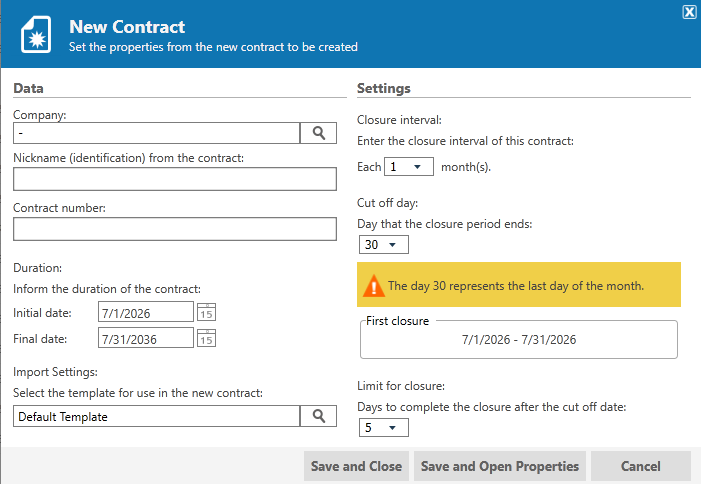
When creating the contract, a screen will appear asking you to specify the contract properties; you must fill them out:
-
Company: Select the company for which you want to create the contract;
-
Nickname: Enter a name to easily identify the contract; you may use alphanumeric characters;
-
Contract Number: Enter the contract number; you may use alphanumeric characters;
-
Duration: Enter the contract term;
Please note that you must take into account the first closing cycle when using the closing module. For example, if the cutoff date is the 20th, you can configure the settings to specify that the contract term begins on the 20th of the month prior to the month for which you want to perform the closing:
-
Default template: Select a template to use for the new contract;
You can select the default template or choose one that already exists in other contracts you've created; it includes settings for services, printing rules, and alerts.
You can also customize the default template.
-
Closure Interval: Enter the closing period for this contract;
-
Cut off day: The date on which the closing period closes;
-
Limit for closure: The number of days allowed to complete the closing process after the cutoff date.
Once the configured limit for closing has been exceeded, the information will be displayed in red, indicating that the closing (freeze) is pending:

Add Printers to the Contract
After creating the contract, you must add the corresponding printers to it. This option is available under Company Properties > Printers:
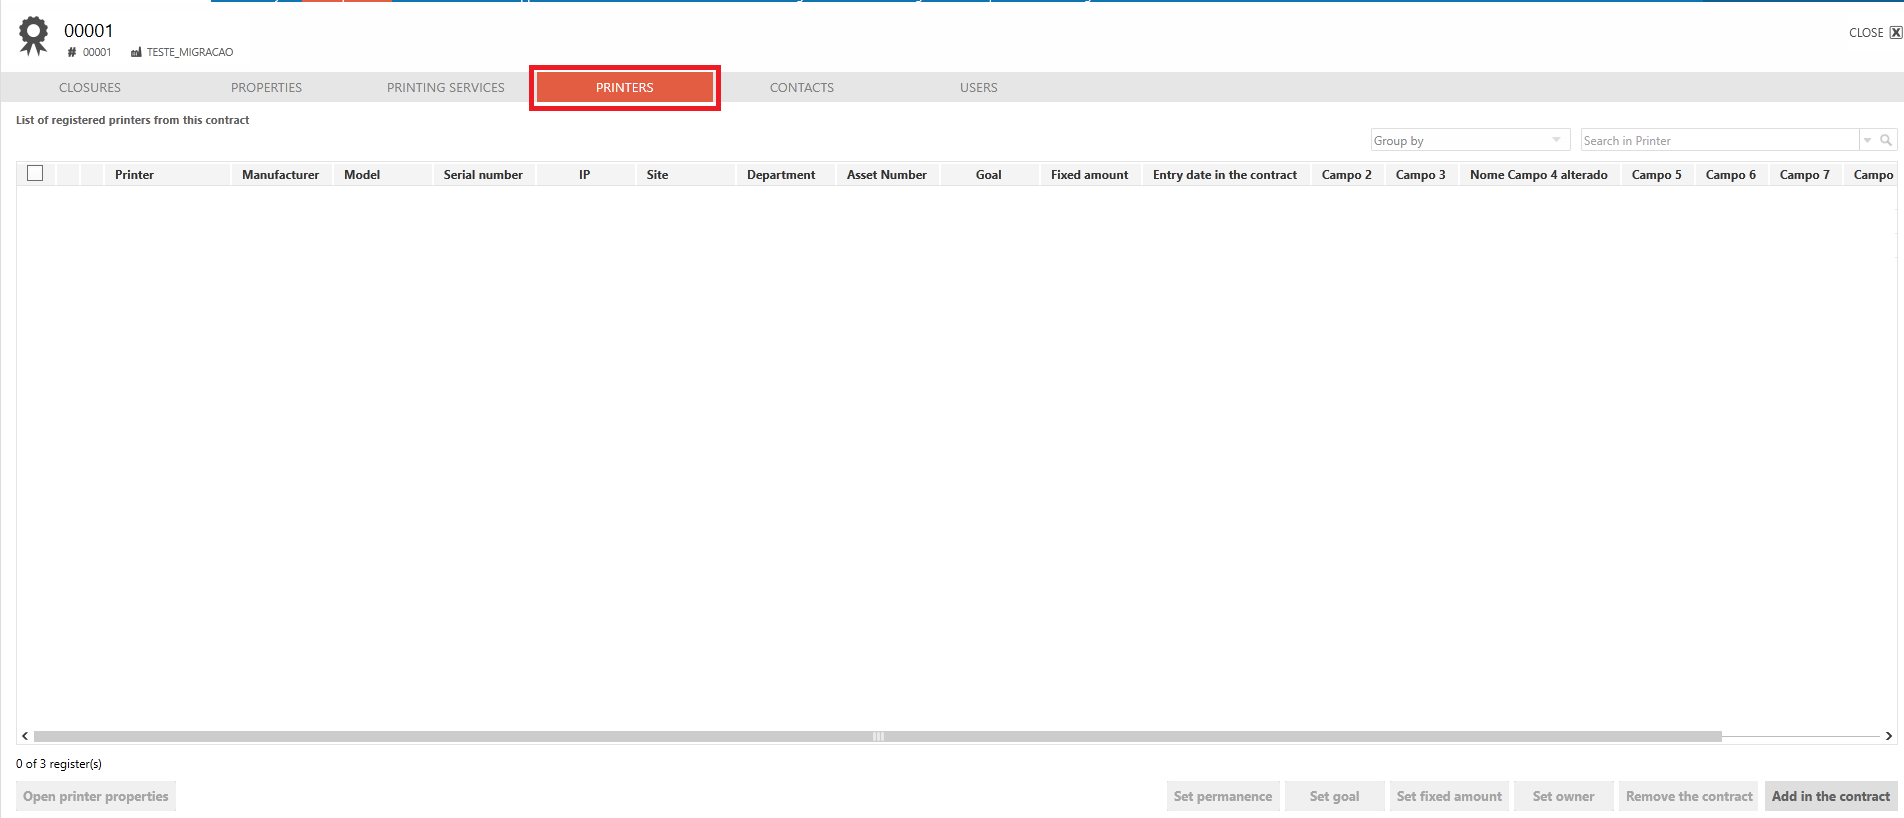
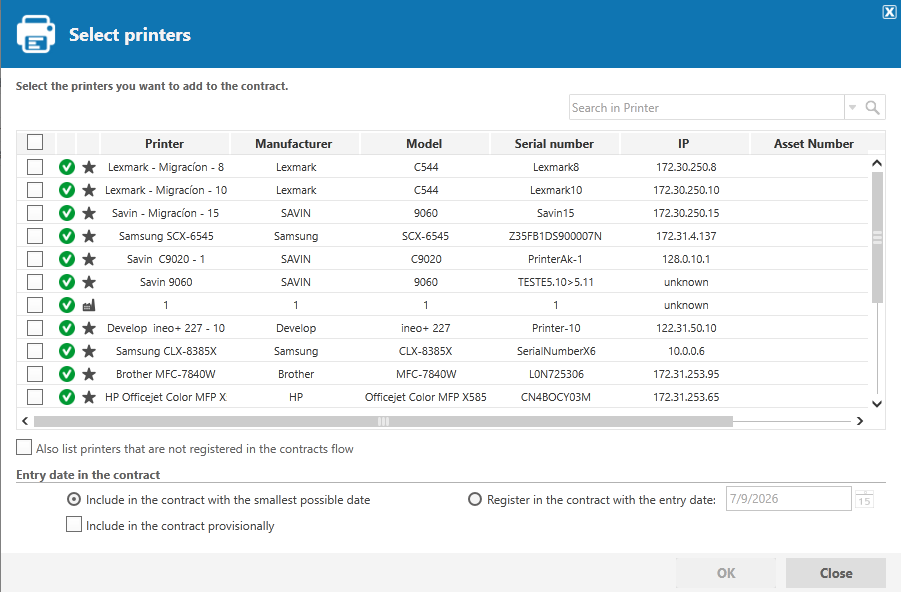
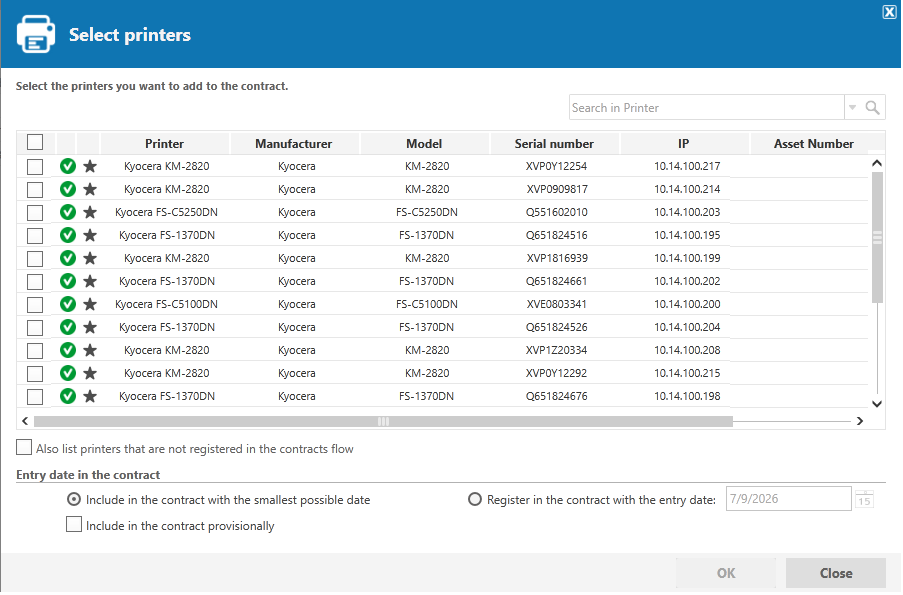
When adding the printers to the contract, a screen will appear listing all of the company's printers, displaying the following options:
-
Printers not in the contract workflow: You can also list printers that are not registered in the contract workflow; printer registration in the contract workflow can be automatic or manual;
-
Include in the contract on the earliest possible date: The system automatically sets the start date to the earliest possible date, based on the printer’s existing history. The contract start date will be the same as the printer’s most recent history; if there is no history, it will be the contract’s initial start date;
-
Register in the contract with the start date set to: Includes the printer with the start date entered in the field. If a date earlier than the allowed date is entered, it will be automatically updated to the earliest possible date;
-
Add to the contract on a provisional basis: Adds the printer with the contract type set to temporary.
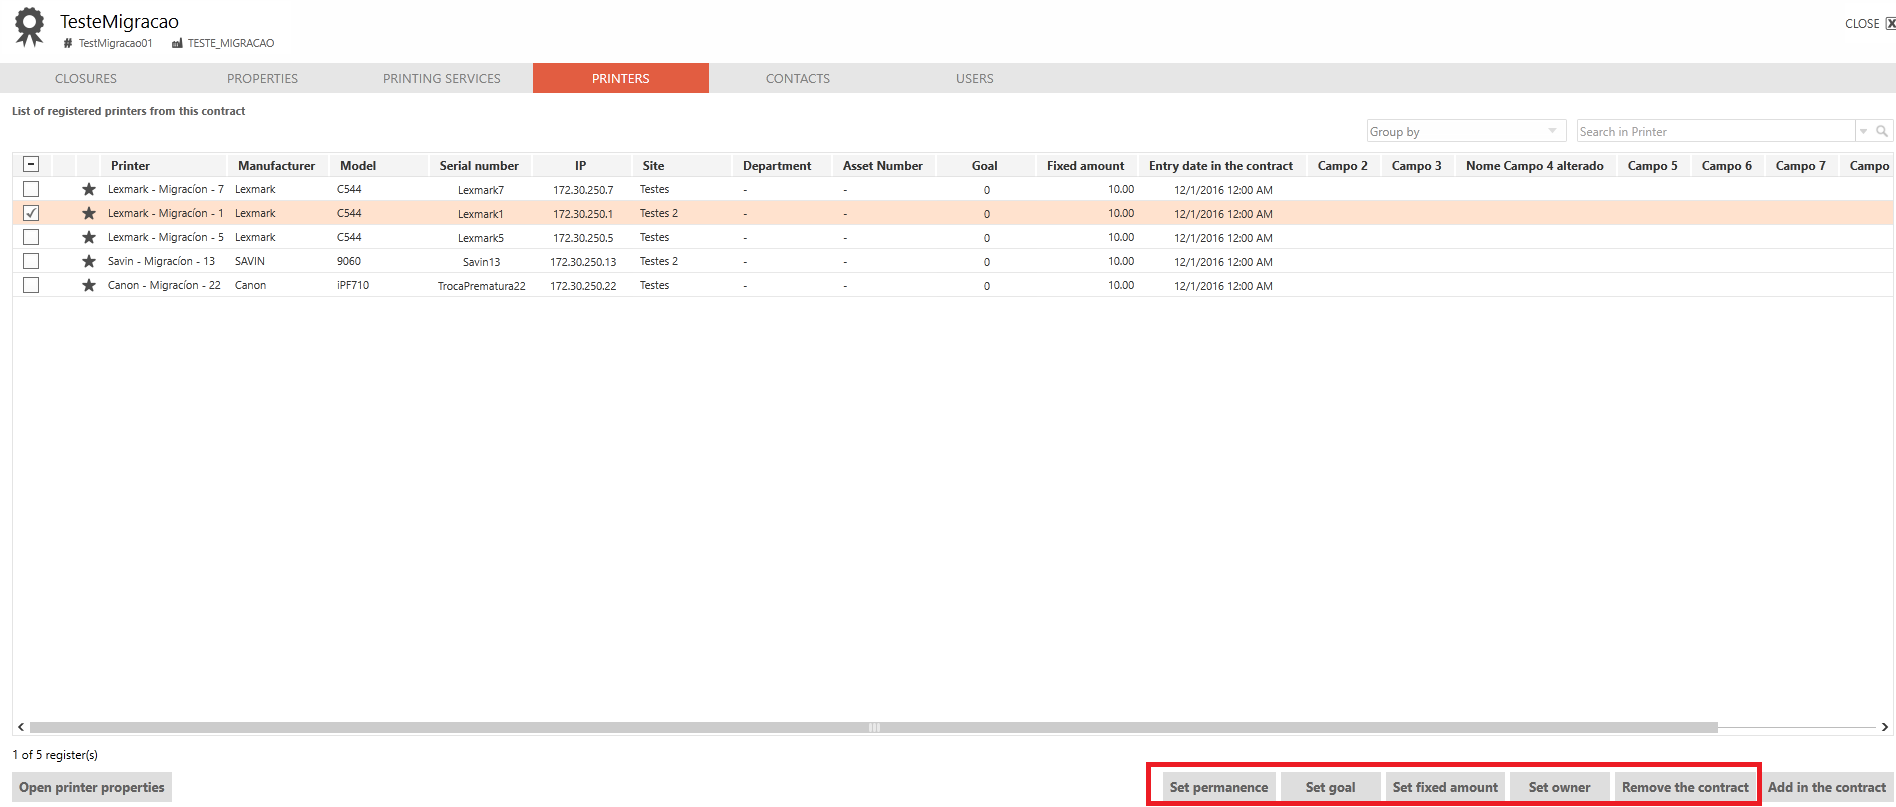
Still on the Printers tab, you can also perform certain actions on contract printers, which are:
-
Set Status: You can specify whether the printer is permanent or temporary; for printers configured as temporary, a clock icon will appear in the grid;
-
Set Target: Allows you to set a total number of pages to be counted per billing cycle for the printer. This value is also used to generate printer target deviation alerts;
-
Set fixed value: Allows you to set a fixed monthly value at the end of the billing cycle for each printer in the contract;
-
Set owner: You can specify whether the printer is owned by the provider or the customer;
-
Remove from contract: Allows you to remove the printer(s) from the contract.
When you remove the printer from the contract, you will be presented with two options: Remove while keeping the history or Remove without keeping the history; in the latter case, all history associated with that contract will also be deleted.
Creating and Managing Print Services
Now that we have contracts with the respective printers, we need to create the print services, but what is a print service?
The print service is the type of service billed under a given contract. For example, a particular contract may charge three different values based on print type:
-
Black-and-white prints;
-
Color prints;
-
Duplex prints.
So we can consider these to be the three print services.
You can create them in the Printing Services tab:
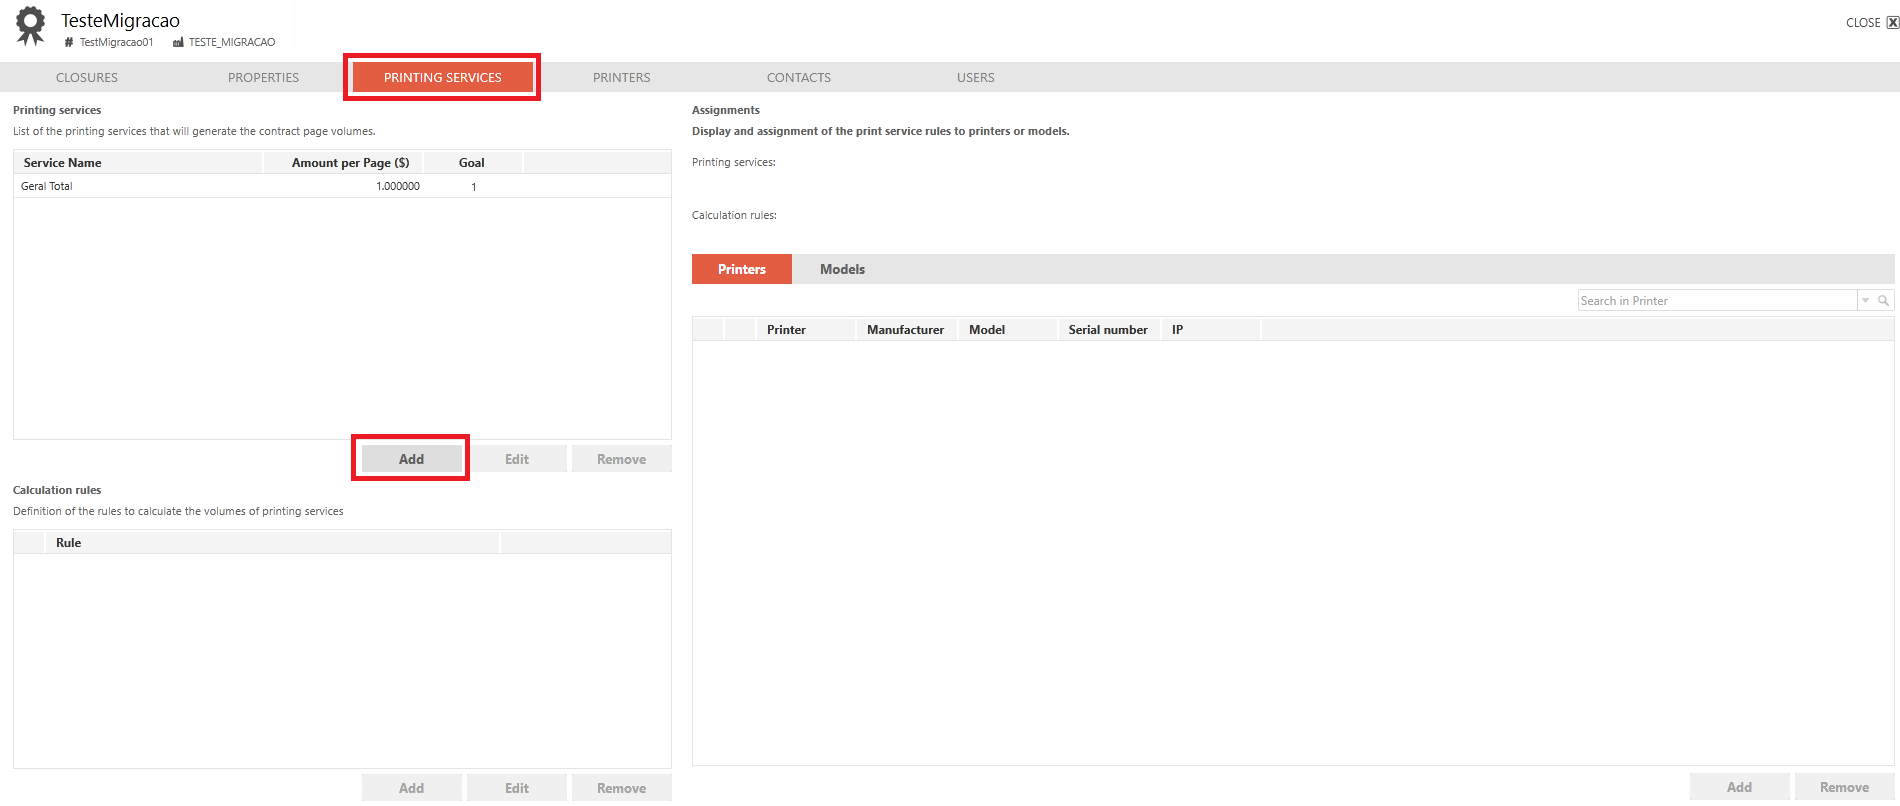
When creating the print service, you can set a target for the service for the closing period, this value can also be used to generate alerts for deviations from the print service target.
For each printing service, you need to create the rules, but what exactly are these rules?
They are basically the meters that make up the printing service; this composition may or may not be mathematical, depending on the billing method. For example, to compose the Black-and-White Printing service for a given contract, the sum of the following meters is used: Print/Mono + Copy/Mono; the sum of these meters will be one of the possible calculation rules for this service.
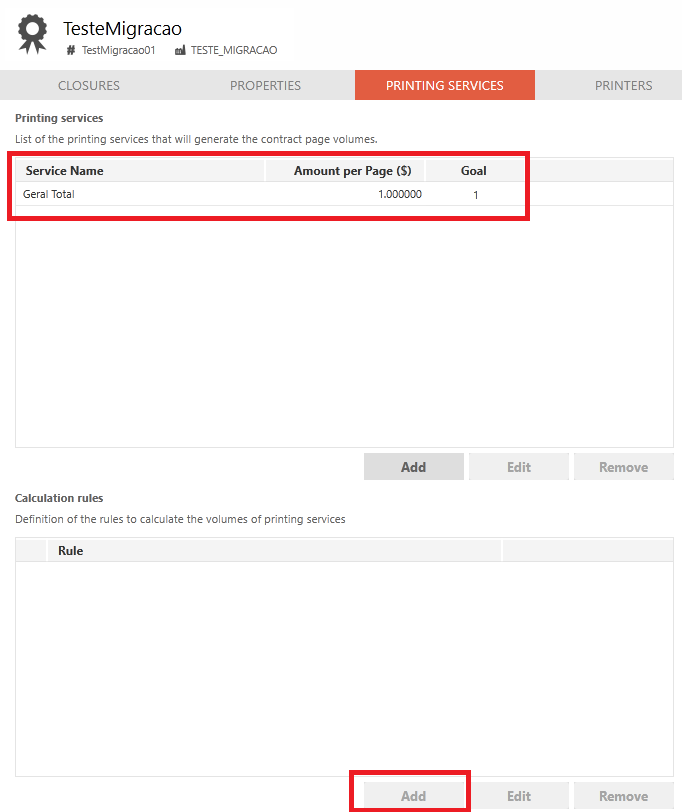
To create the rules, simply select the respective printing service, and the Activate button in the Calculation Rules grid will be Enabled:
We know that, in addition to the characteristics of each manufacturer, there may also be differences between models from the same manufacturer; among these are the meters, which may have different names depending on the equipment families or models. Therefore, when creating rules, you can filter by model or manufacturer to correctly verify the meter name(s):
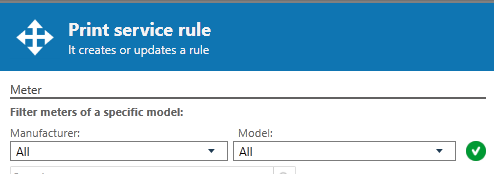
It is extremely important to create the rules using the correct meter name, exactly as it appears on the equipment; otherwise, failures may occur during closing and reporting, requiring you to edit the respective rules.
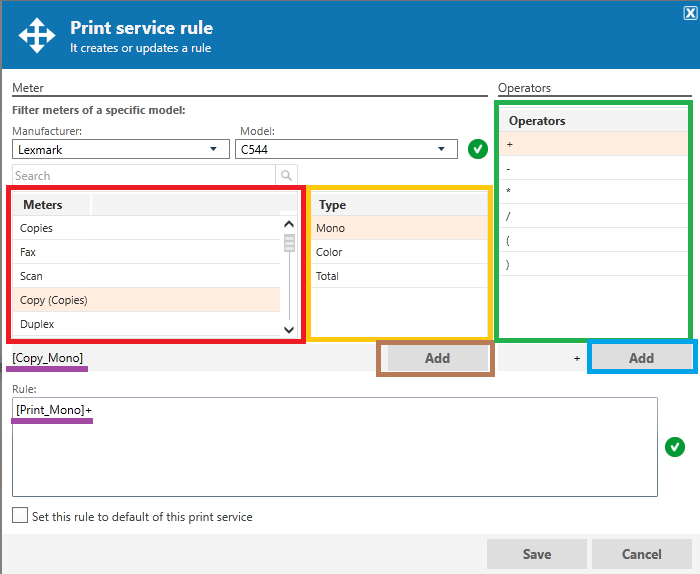
If you need to filter by a specific model, apply the filter, and only the meters for that model will be displayed. After that, you can set up the rules you want:
-
Select the desired meter to set up the rule, keeping in mind that the meters will be displayed according to the applied filter, if no filter has been applied, all meters already recognized by the system will be displayed;
-
Select the desired counter type to set up the rule;
-
Add the counter items and type to set up the rule;
-
Select the operators that can be used when creating the rule;
-
Add the operators to the rule;
-
Preview the information corresponding to the rules that will be created;
You can select the Set this rule as default option. When you select this option, all contract printers that are not associated with a rule will automatically be associated with this rule:
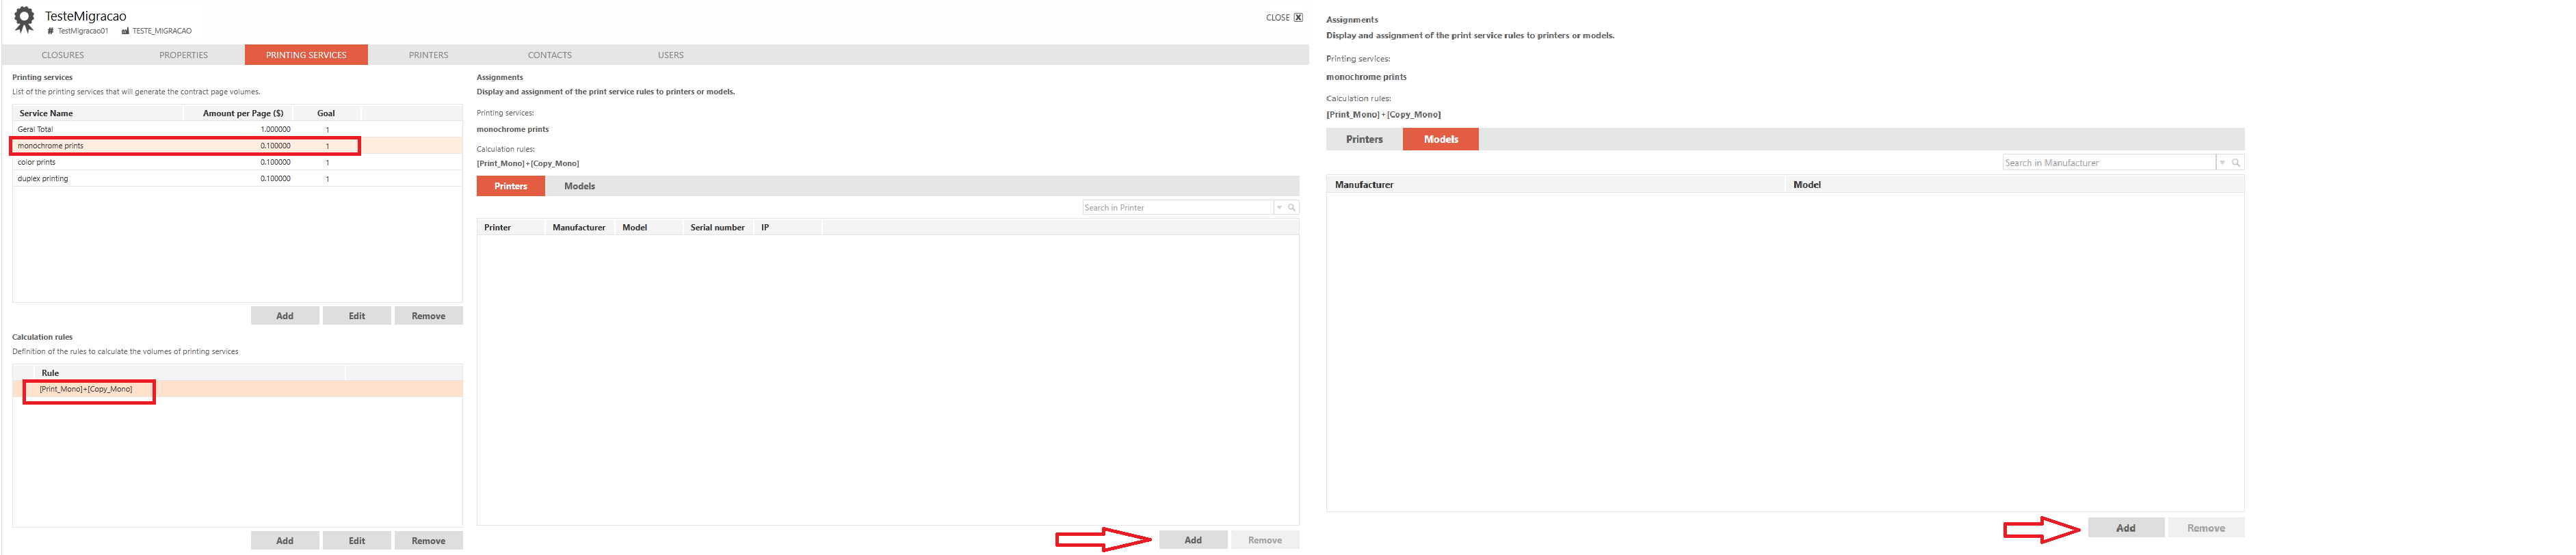
After creating the print service and its calculation rule(s), you must specify which printers or models will be associated with this rule. To do this, simply select the calculation rule, after that, the Add button will be enabled on the Printers and Models tab:
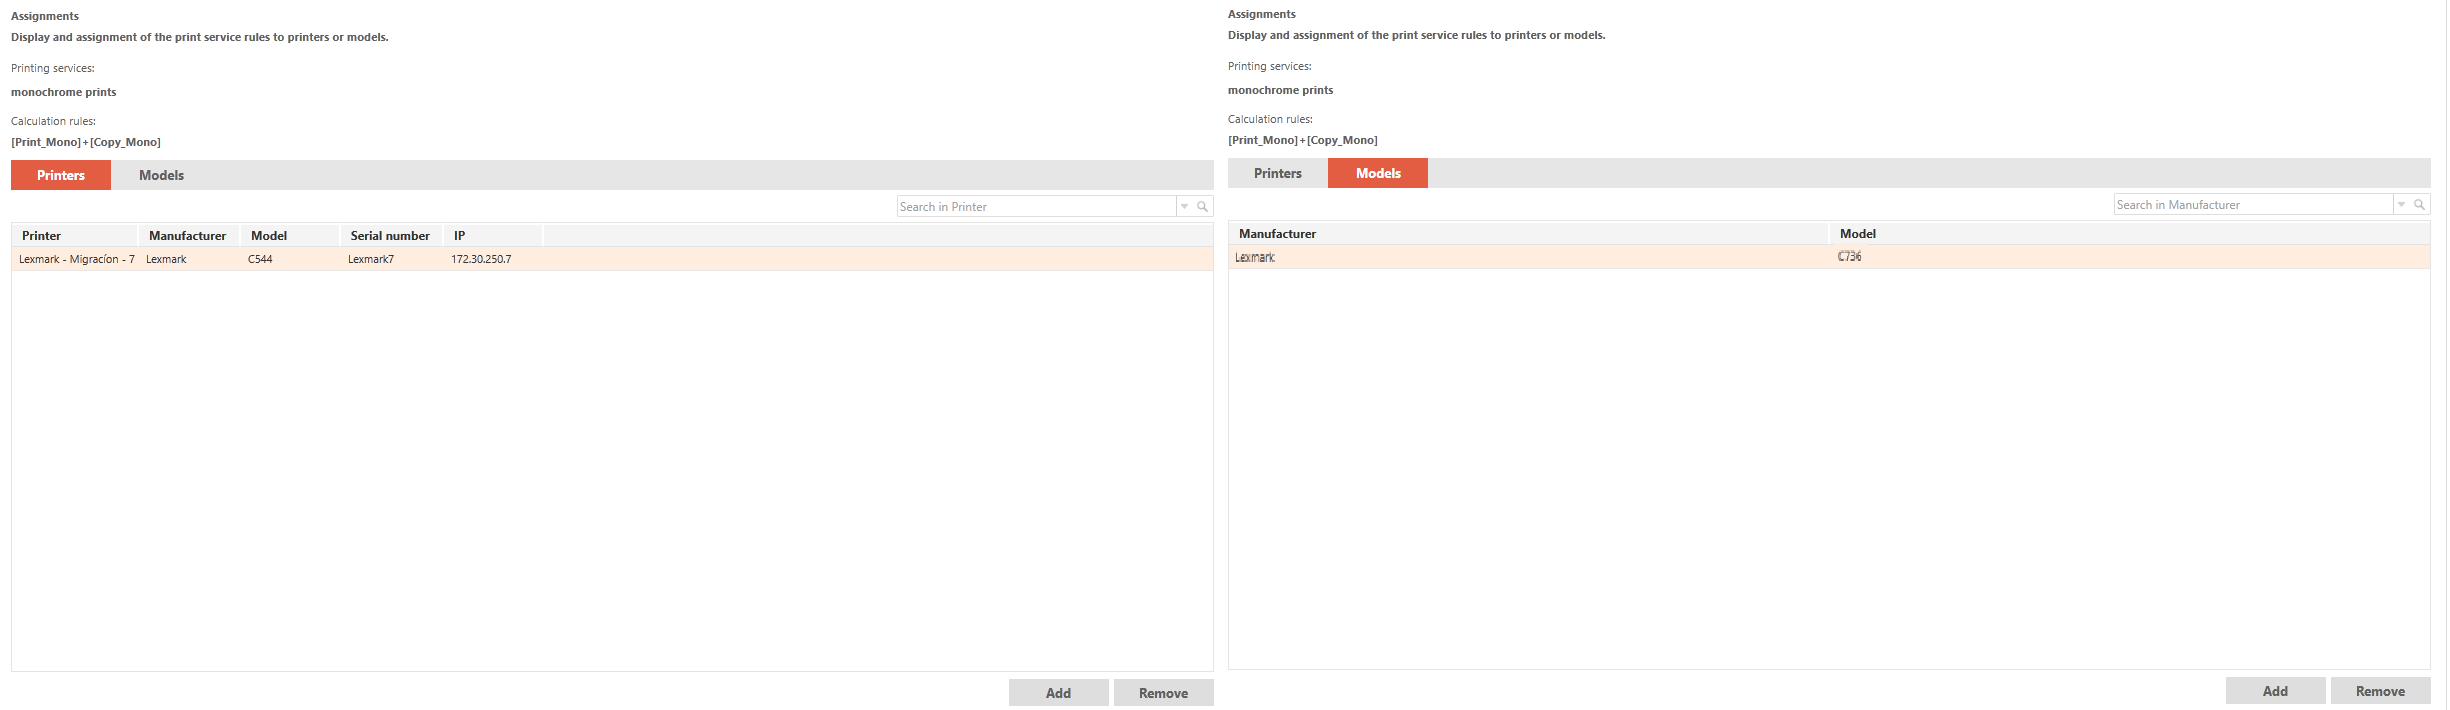
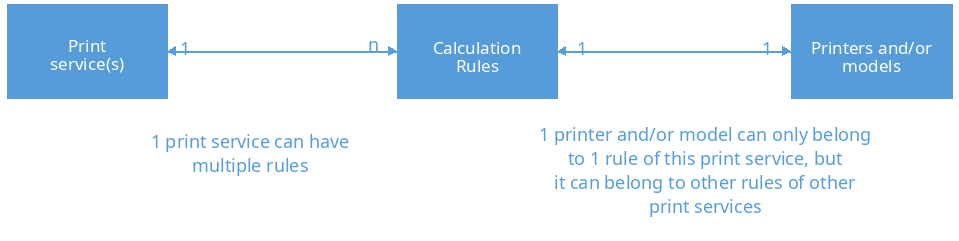
Before wrapping up this topic, let's review the relationships we've viewed here:
Alert Configuration
To assist in analyzing potential issues during closing, this module includes several alerts that help the operator perform analyses; these alerts can be edited, enabled, or disabled to meet the customer’s needs.
To edit contract alerts, simply go to the contract properties and select the Alerts tab:
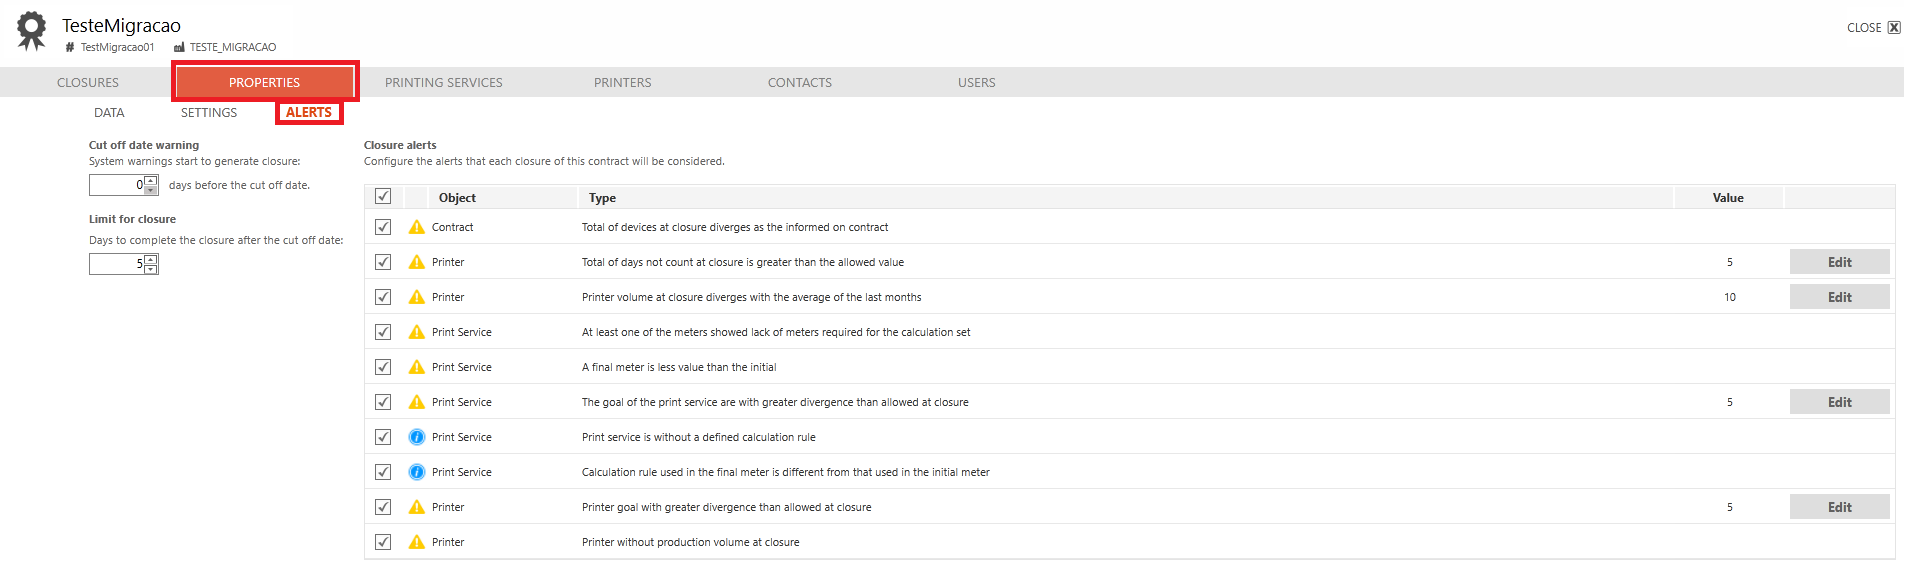
For details and descriptions of each alert available in the system, click here.
Default Template
To simplify the configuration of multiple contracts, you can create a default template with certain predefined settings, which are:
-
Services
-
Printing Rules
-
Alerts.
The default template is available on the Companies > Contracts tab:
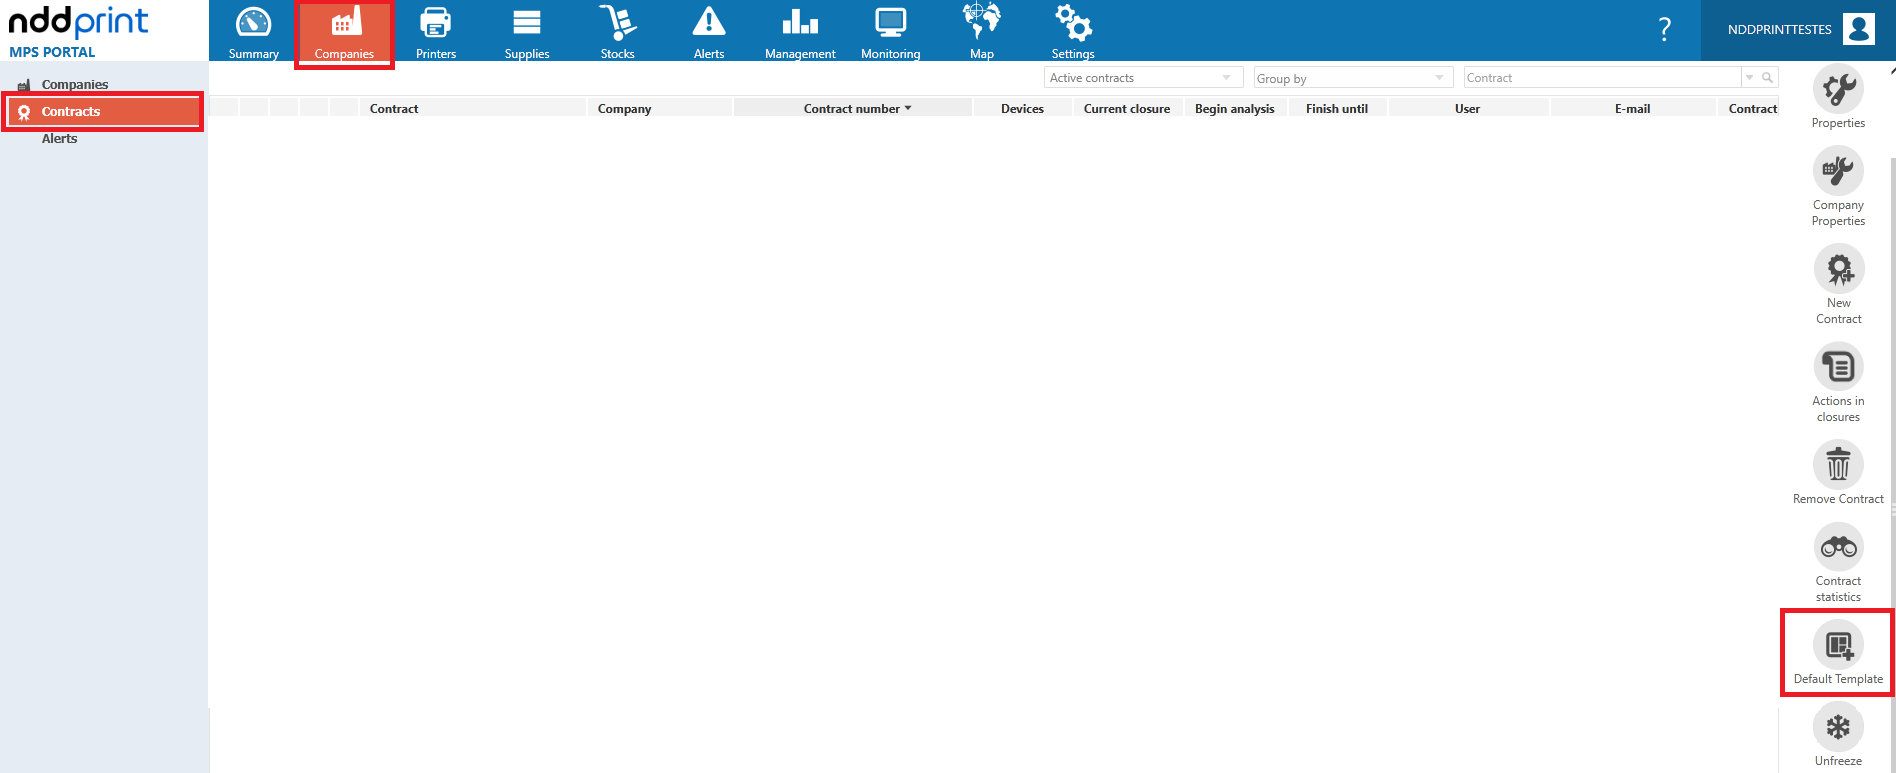
When you select it to edit, the following screen will appear:
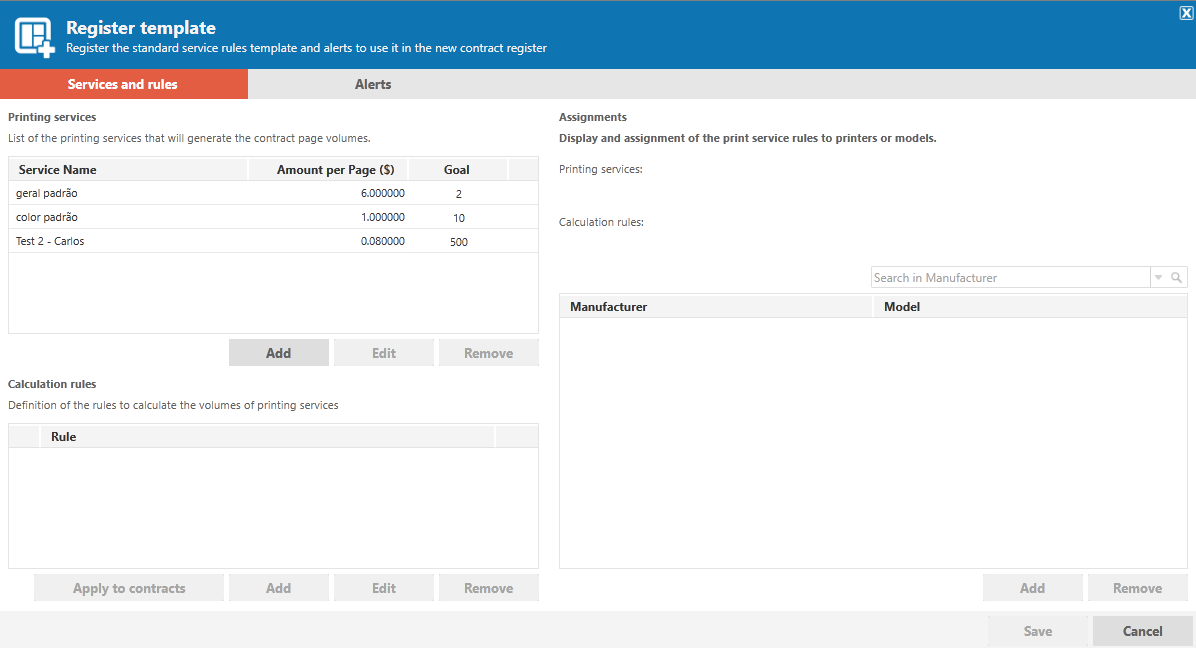
As we can see in this template, it is possible to configure Printing Services, Calculation Rules, and Alerts.
Permissions
To configure the settings described in this document, you must have permissions to manage contracts:
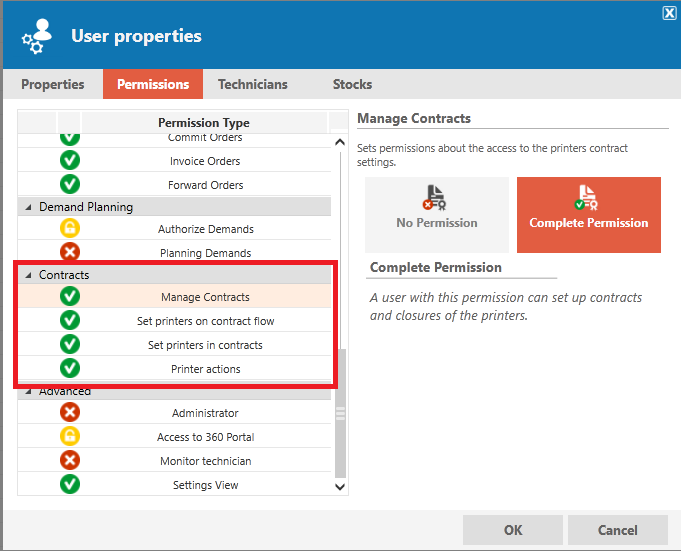
As we can see, the following options can be set for contract permissions:
-
Manage contracts: Top-level permission; without it, the other permissions (listed below) cannot be enabled:
-
Assign printers in the contract workflow: Allows you to enable or restrict a user's ability to add or remove printers from the contract workflow;
Contract Flow: In MPS, “contract” and “contract flow” are distinct concepts; therefore, when a printer is included in a contract flow, it is not necessarily assigned to a contract. The “contract flow” option is used to link to replenishment rules.
-
Assign printers to a contract: Allows you to enable or restrict a user's ability to add or remove printers from the contract;
-
Printer actions: Allows you to enable or restrict a user's ability to change printer information.
This permission applies to all editable information in the system, such as: printer name, person in charge, operating mode, and others.
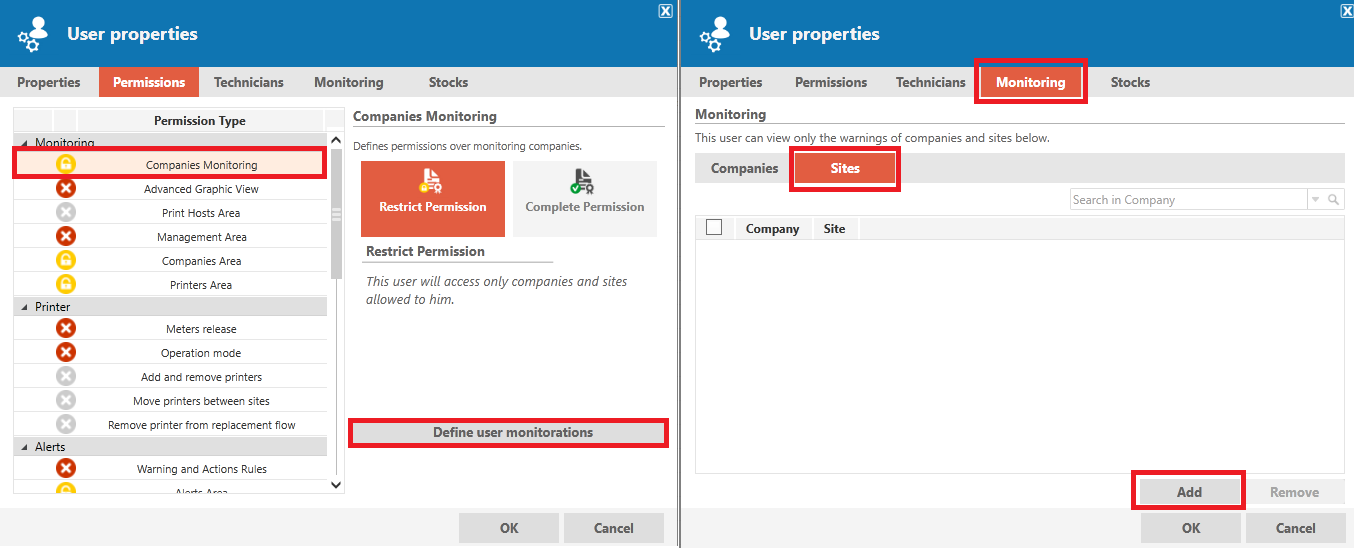
Please note that these permissions (detailed above) are directly related to the Company Monitoring permissions; in other words, the company permission rules will allow or restrict the viewing of printers in the specified company(ies) and/or sites:
For changes to system permissions, contact the MPS administrator at your company.
Frequently Asked Questions
Can I create more than one contract for a company?
Yes, the closing module allows you to create multiple contracts for a single company.
Can the same printer be listed in two different contracts?
No, the relationship between a printer and a contract is 1:1; that is, a printer can only be associated with one contract.
Can I have the same printer assigned to more than one print service?
Yes, there is no limit to the number of print services a printer can be assigned to; in fact, it’s very common for color printers to be assigned to two print services (monochrome and color).
Can I have the same printer assigned to more than one calculation rule?
Yes, but only if the rules belong to different print services. If a print service has multiple rules created within it, the printer cannot be assigned to more than one rule within that service.
What is the difference between a contract workflow printer and a contract printer?
A contract workflow is one of the possible rules used to manage printers for which you want to control supplies and meters within the MPS operation; therefore, a printer can be part of a contract workflow, but it is not necessarily a contract printer.
Contract printer: When you add a contract printer, it is automatically added to the contract flow; there is no way to add it only to the contract without also adding it to the contract flow.
If I add a printer to the contract flow, will it be added to the contract?
If the company has only one active contract, the printer will already be automatically included in that contract.
If I remove a printer from the contract flow, will it still be assigned to the contract?
No, as soon as you remove it, it will automatically be removed from the contract.