
Objective
This document contains information and step-by-step instructions for operating the Supplies module. Please note that the Supplies module must be properly configured; to do so, refer to the Supplies Module Configuration Guide.
Before You Begin
The following features in the system relate to procurement and replenishment operations:
-
Generating Replenishment Requests (Finishing and Forecasts)
-
Analyzing Requests and Generating Purchase Orders
-
Handling Supply Alerts
Demand Generation
During MPS operations, there is a lot of talk about demand, but what exactly is a demand in the context of MPS?
A demand is a need for materials (toner, drums, etc.) that have been requested by an authorized user (depending on permissions) and may or may not result in orders.
The MPS has five demand generation points that can be used; however, this guide will cover only three that are used daily in operations to replenish customers' stocks.
Forecast
For MPS, forecasting involves estimating the quantity of materials the customer’s stock will need over a period of X time. To make this easier to understand, let’s look at an example:
-
You want to forecast the replenishment for a customer once a month, that is, every 30 days;
-
The all-inclusive ordering, invoicing, and shipping process takes approximately 10 days.
-
The first forecast aims to send the materials the customers will need during the period from June 30 to July 30.
We know, then, that forecasting will take place every month, and it must always be done at least 10 days in advance to cover the specified forecasting interval, as shown in the timeline below:
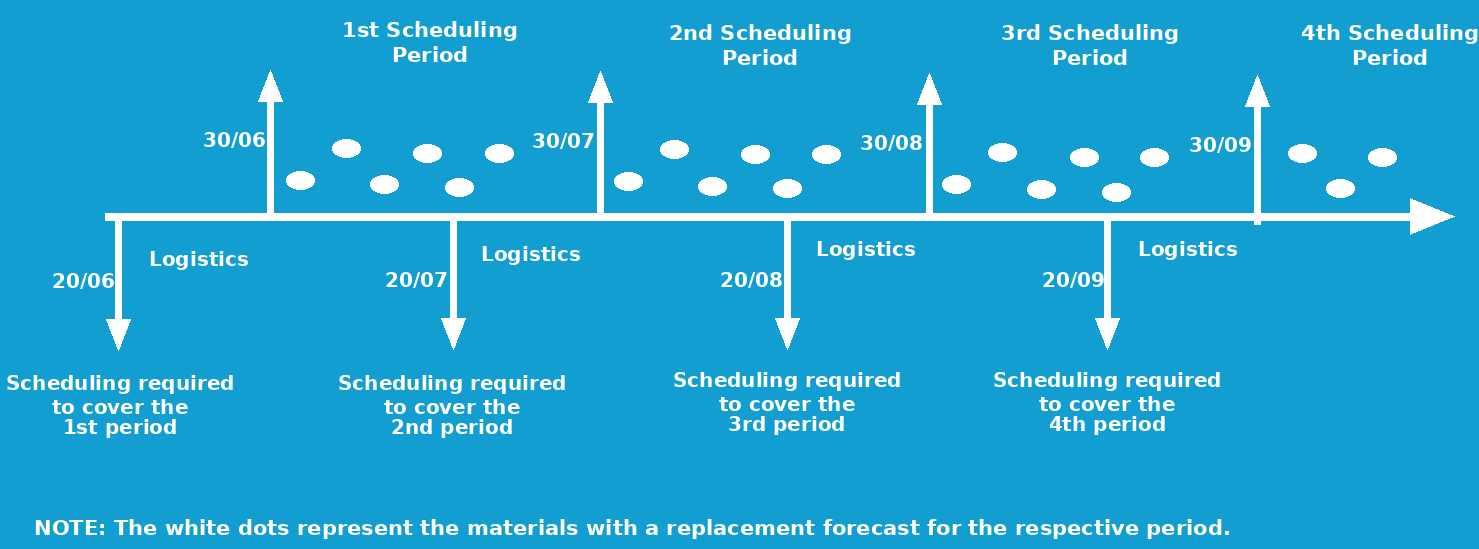
Therefore, when managing supplies through scheduling, it is possible to monitor materials on an ad hoc basis over the 30-day period as they are finishing since the forecast is already planned for that 30-day period, except for materials with a new projected end date identified after scheduling, which may occur due to a production peak, for example.
To generate a schedule, the user must navigate to, Stocks > Forecast > Generate Forecast. Upon opening the forecast generation screen, the user must select the stocks to be scheduled and enter the desired forecast dates if they have not already been defined in the stock configurations:

-
Forecast until: The date until which the forecast will cover the facility; in the example above, the forecast will last until February 24, so it is necessary to generate a new one before then so that the new items will already be available to the customers on the 25th.
-
Request up to: The start date of coverage for the facility. In the example above, we are specifying that the MPS can “count on” the items requested in the forecast being delivered on February 17.
It is essential that the dates be set correctly based on actual logistics conditions to ensure there are no risks related to replenishment!
After selecting the stock and confirming the dates, click Forward. A screen will appear showing a list of printers and supplies for the selected stock items, allowing you to adjust the materials and quantities to be ordered.

-
List supplies with pending: When checked, this option lists in the grid the supplies that do not have an average number of pages per day defined or for which no material model has been selected for ordering. When unchecked, supplies with pending issues will not be listed, unless the filter to display supplies that need replenishment is also unchecked.
-
Show supplies that need replenishment: When checked, the grid lists only those printer supplies that need replenishment by the end of the scheduling period to be generated. When unchecked, the grid lists all printer supplies, regardless of whether they need replenishment by the end of the scheduling period to be generated.
By default, only those printers whose supplies need replenishment and that have no outstanding issues will be displayed.
Based on the filters indicated above, the grid will be displayed, listing the supplies that the system estimates will run low during the period and the printers they are installed in, along with data on extra days, end of current supply, coverage, average pages per day, etc.
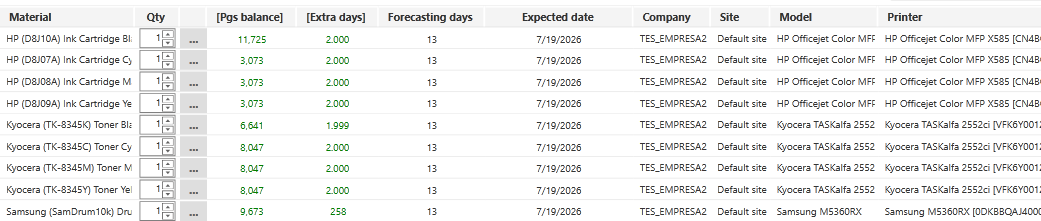
At the start of the grid, alerts may also be generated for the materials in question. Here are some examples:
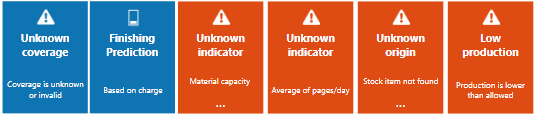
For more details about alerts, see the Forecast – Alerts section in the Manual.
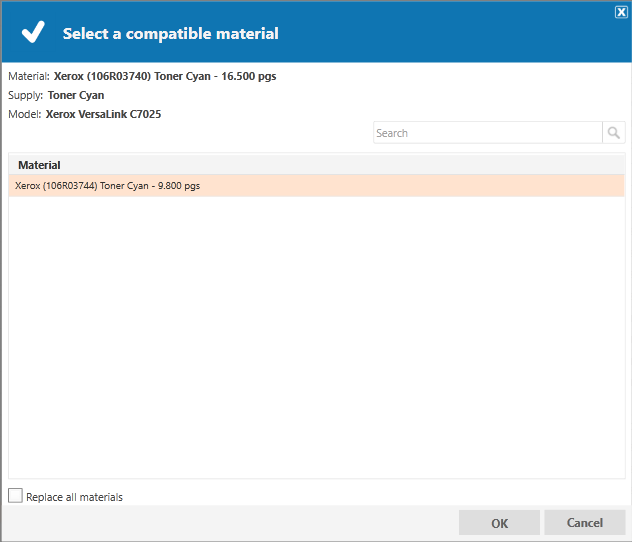
If you wish to change the material requested by the forecast, which, by default, will request the material currently in the printer, click the [ - ] icon in the row corresponding to the supply for which you want to change the material. In the window that opens, simply select the supply model:
After making all the desired settings on this screen, click Forward. The forecast completion interface will appear, displaying a summary of the requested materials, data about the demands that will be generated, and the materials available in stock to be reserved. Here, you can perform actions to finalize the forecast;

-
Security Balance: Shows the quantity of materials available—or “pending receipt”—in stock that are not scheduled for any printer.
-
Spare Balance: Shows the quantity of materials available—or “pending receipt”—in stock that are already scheduled for a printer.
-
Replacement Demand: Total quantity requested for each material, as defined on the previous screen.
-
Minimum: Shows the quantity of each material needed to maintain the minimum level, based on the inventory level settings.
-
Maximum: Shows the quantity of each material needed to maintain the maximum level (safety stock), based on the inventory level settings.
-
Security Amount: Displays the quantity of material that will be ordered to maintain the maximum quantity of the material in stock. This quantity can be changed by simply increasing or decreasing the displayed value.
-
Reservation: Indicates the quantity of items that will be reserved from the customer’s inventory.
After verifying the generated data, you must finalize the forecast. When you click “Request,” two scenarios may occur:
-
If the forecast has requested any materials, Demands will be generated.
-
If nothing is requested for the period, either because there is no need or because there are sufficient items in the stock to cover the period, clicking Request will reserve the items and the process will end.
More details about customer stock forecast (ECs) can be found in the Manual.
Finishing
When a supply is marked as “Finishing, it means it will need to be replaced soon.
It is important to note that if there are supplies reserved in stock, either through forecast or manually, the alert will not be generated, since the system considers a supply to be finishing only when the printer’s material is running low and there is no replenishment in stock.
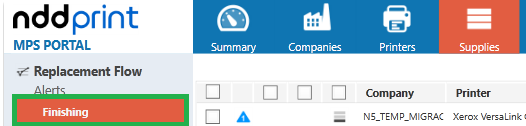
The supply may be displayed in the Finishing alert due to three factors, which are:
-
Finishing based on the Current Level;

-
Finishing based on Production;

-
Finishing based on the estimated days to completion;

You can tell the reason the supply is being displayed in Finishing by looking at the icons:

You can find instructions in the Configuration Manual on how to configure each of the three Finishing rules so that they are best suited to the environment in question.
There are two ways to handle a Finishing alert:
-
Locate the item in question in stock and, if available, reserve it for the printer in question. To do this, click “Find replacement” in the menu button that is available when you select an alert:
-
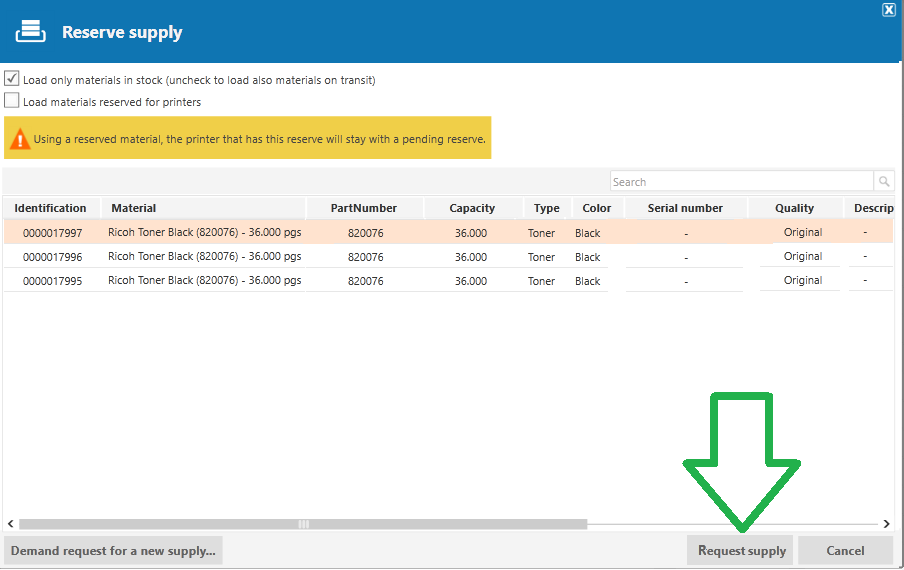
Finally, simply select the item you want to reserve and click Reserve Supply to complete the reservation:
-
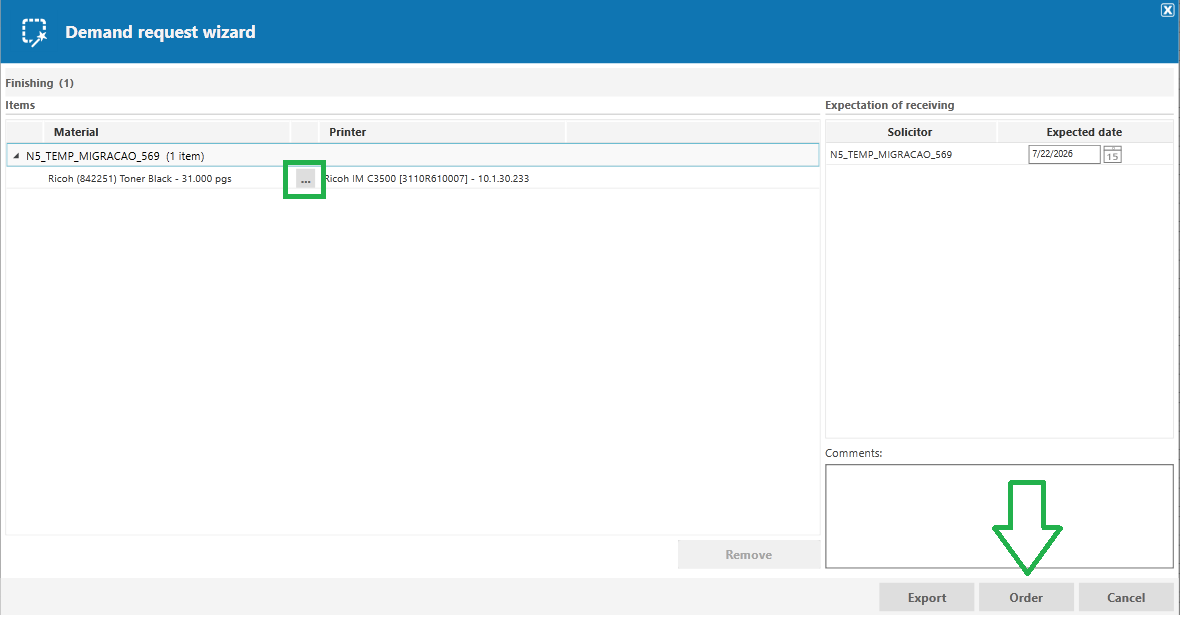
To submit an emergency demand if an item is not in the stock, click Demand Request:

-
Finally, select the material you want to request in •••, then click the “Order” button:
If there is an equipment alert for stock that has been properly scheduled for the period, it is advisable to conduct an analysis to understand the reason for the issue, which is generally due to unexpectedly high Production, an improper inventory write-off, lost materials, etc.
Service Portal
This is one of the possible demands that can be generated by the MPS; however, it can only be used if a customer of the provider is using the Service Portal. It is through this portal that the user will approve or reject demands opened by users. If the demand is approved, it becomes a ticket; if rejected, a message is returned to the user on the Service Portal stating the reason for the rejection:

Demand Analysis and Order Generation
After demands are generated, whether through forecasts, running low, or the Service Portal, the demands will be generated under Stocks > Demands:
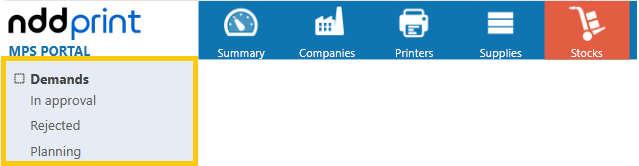
Requests will be displayed in the Grids according to the user’s permission level:
-
In Approval: Requests that have been submitted but not yet approved, and are pending approval by a user responsible for Authorizing Requests;
-
Rejected: “Safety” or “Forecast” requests that were not approved or were canceled in Planning;
-
Planning: All approved demands that are pending for the user responsible for Demand Planning to generate the order for the supplier. If the user who created the demand has permission to Plan, the demands will be generated directly in the Demand Planning grid without requiring approval.
After the approval procedures are completed (if necessary), the demands will be displayed in Planning, where you can generate purchase orders for replenishment processes that take place entirely within the MPS or send the demands for integration, if the process is integrated.
Demands are categorized by their origin; they may come directly from Inventory (Safety Stock), Planning, Finishing, or the Service Portal.
For integrated processes, simply select the desired Demands and then click the “Send for Integration” button; this action will flag the demand so that the ERP can automatically generate the purchase orders:
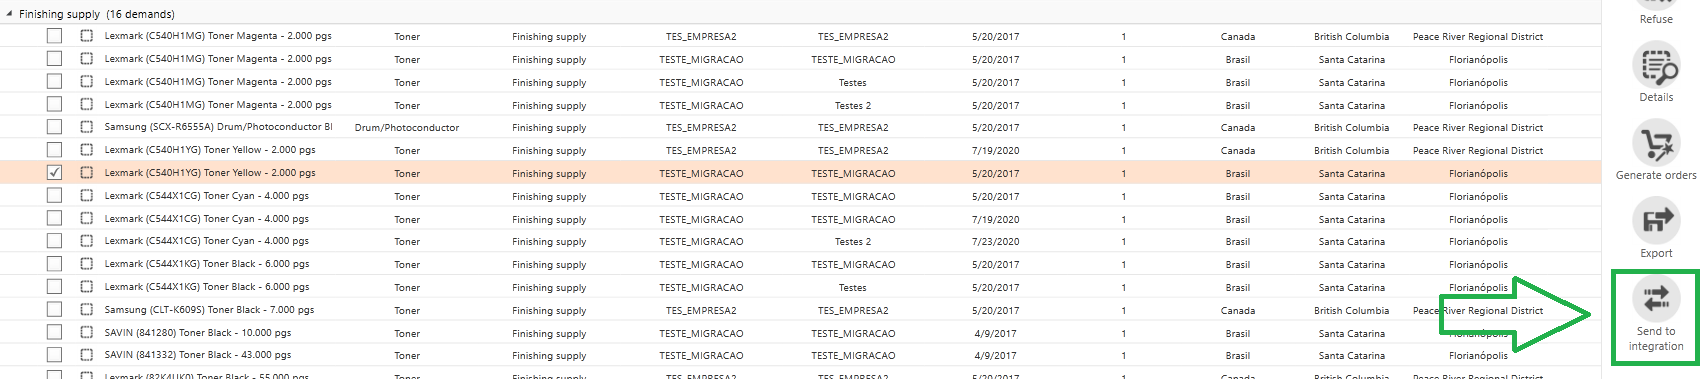
Demands sent for integration will be marked with the symbol, as shown in the example below:

Once this is done, the integration will automatically generate the purchase orders after they have been invoiced in the ERP.
For non-integrated processes, you must select the demands and generate the purchase orders for them by clicking the Generate Order button:

If the supplier is selected on the screen prior to order generation, the system will generate the demands with the supplier already specified; if not, you must select the supplier on the first screen of Order Generation:
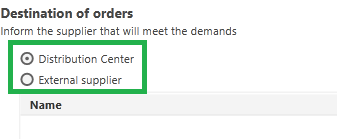
After selecting the supplier, simply verify the demand and quantities, and if everything is correct, just complete the order generation process.
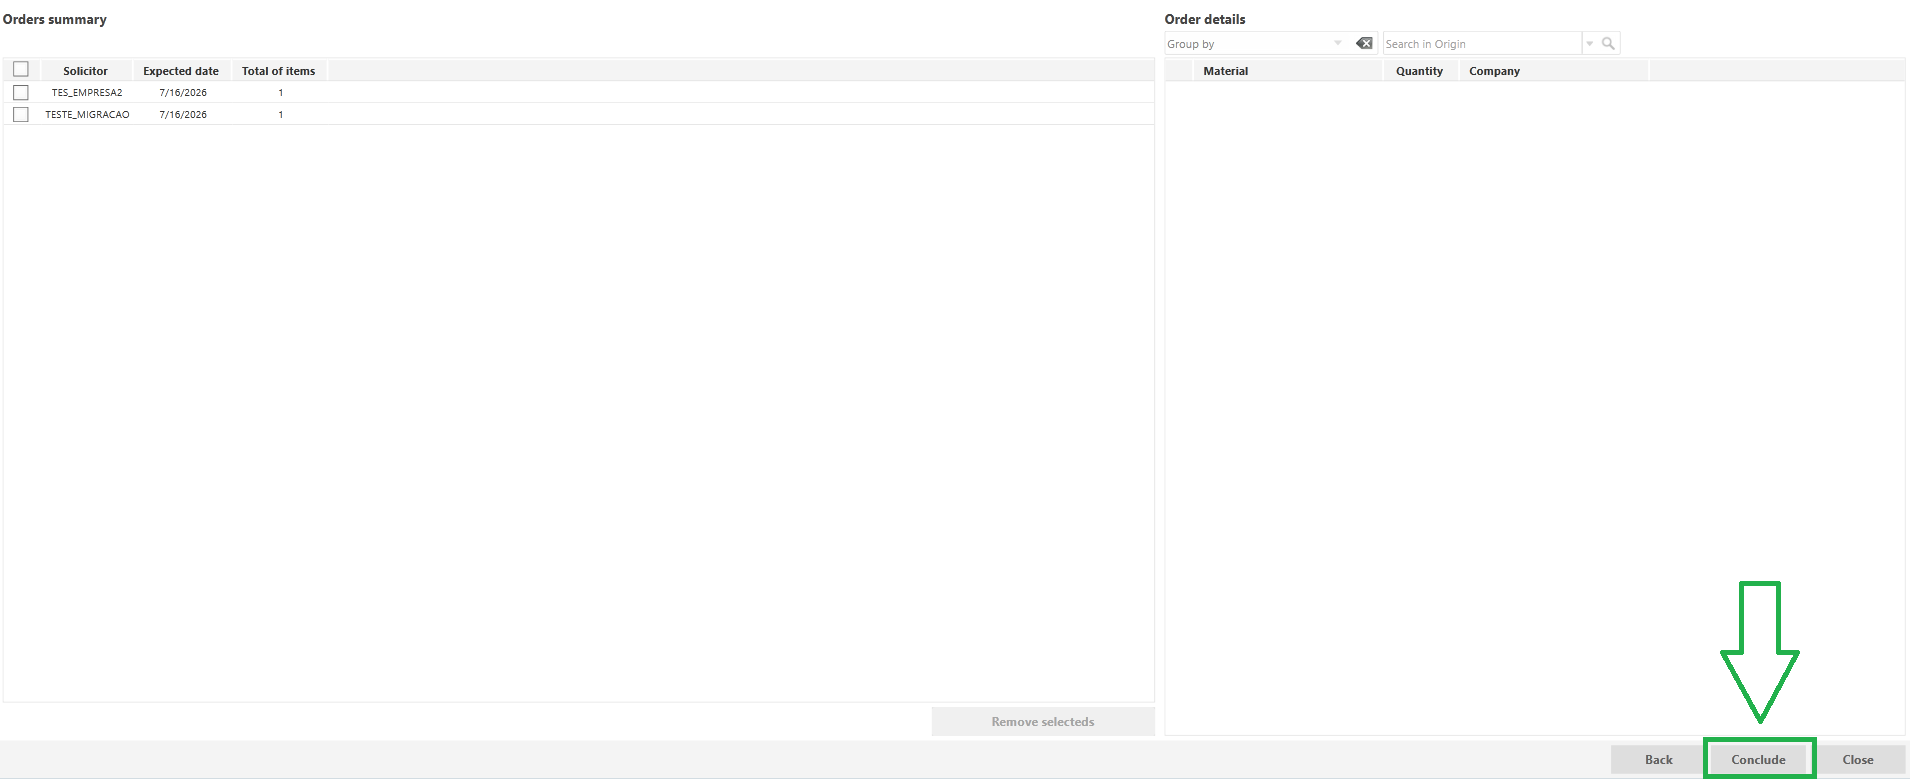
The generated orders will be displayed under Orders > Incoming Orders with the status “Processed”.

In this step, you can generate a list of order items, export the data, or view the order history under Properties.
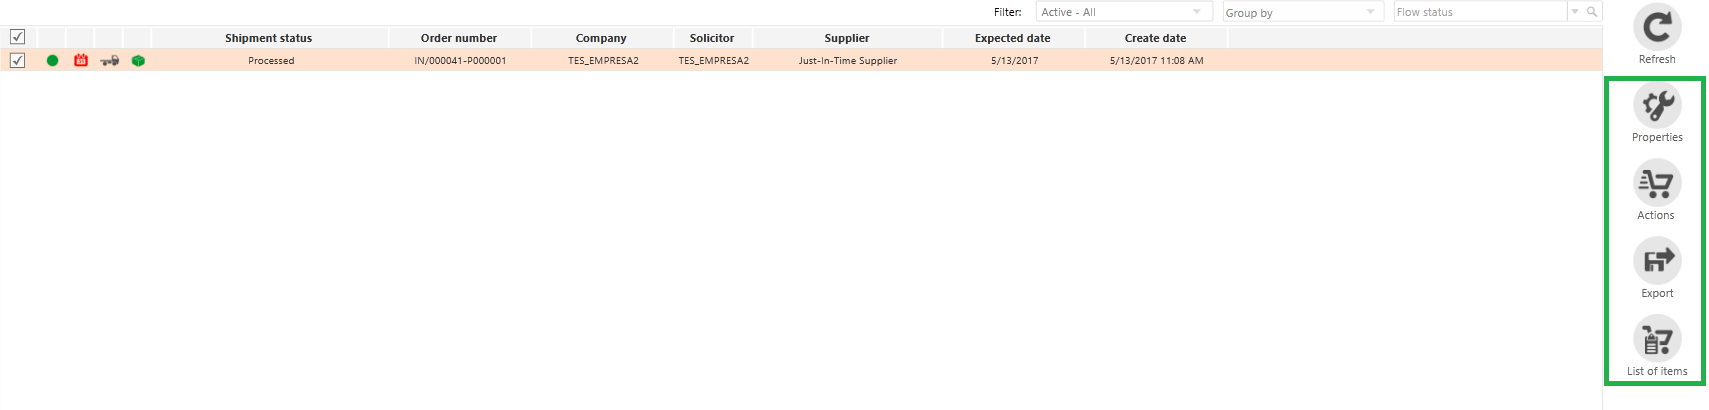
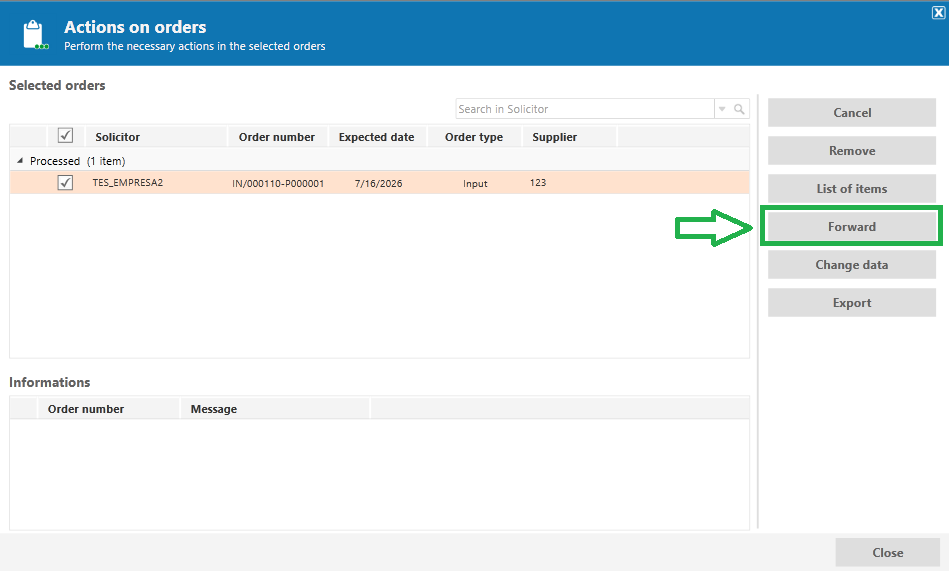
To proceed with the order, click the Actions menu. Once the order is in transit, you can mark it as “Forwarded” using the Forward button:
Once the order is complete (delivered to the customer), simply click on Item Receipt. After the items are received, they will be added to stock, and the order will be automatically closed by the system:
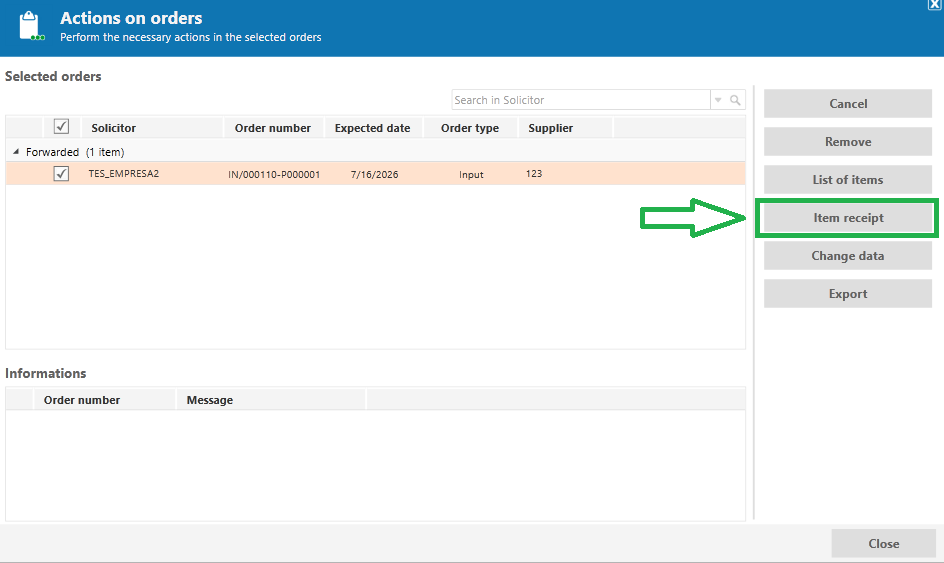
If only some of the items are received, the order will remain active until it is canceled or the missing item is received.
Completed orders can be viewed using the filter available on the Orders tab:
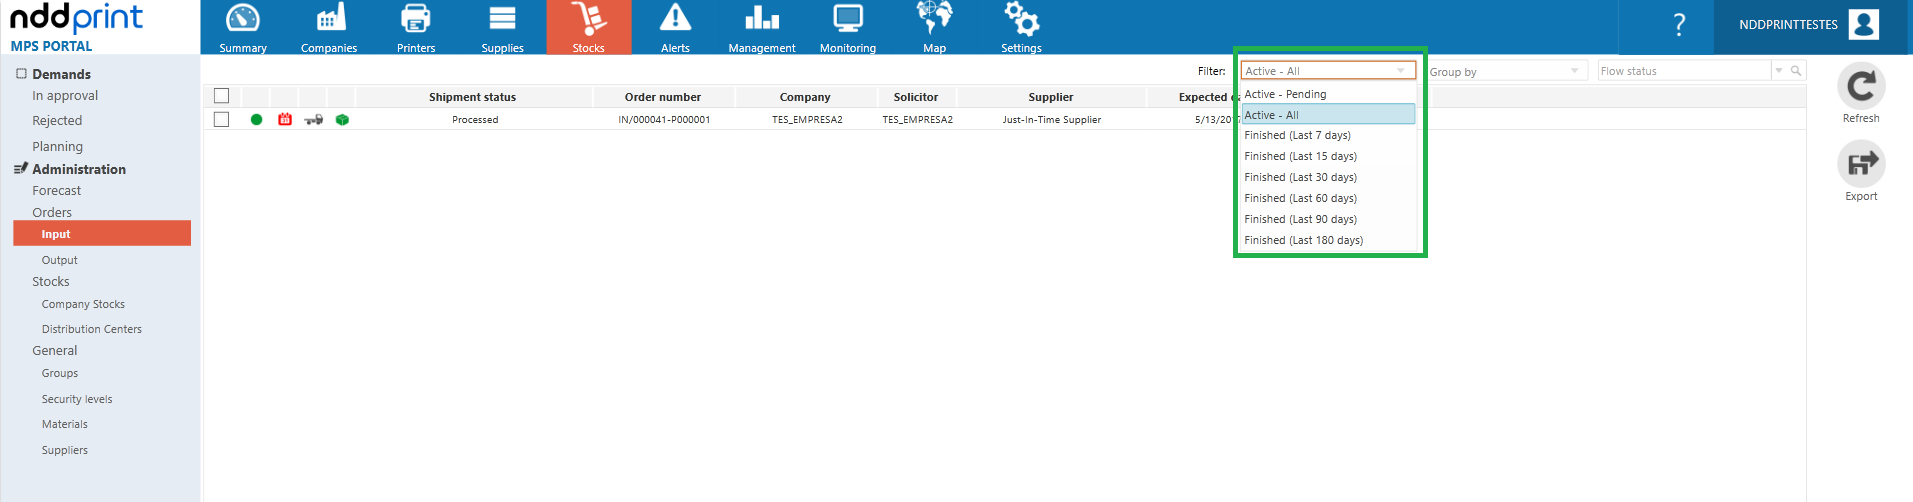
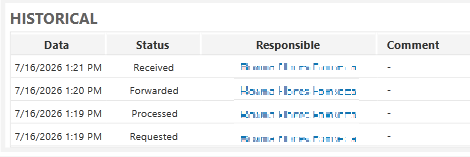
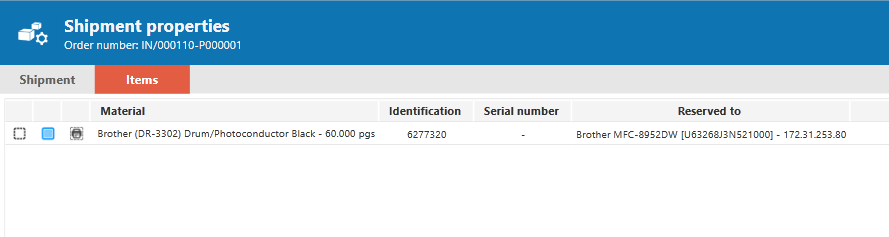
The history of all completed orders is maintained and can be viewed at any time through the order's Properties:
Action History:
History of items that were included in the order in question:
Handling Supplies Alerts
With the stock already in operation, it is extremely important to frequently monitor the system’s Supply alerts; these alerts will notify the operator of situations that require their attention, preventing, for example, the customer from running out of supplies due to an unforeseen situation (loss, unexpected Production).
The alerts are also designed to flag waste and keep stock as up-to-date as possible, as they notify the operator of potentially invalid transactions so that they can take appropriate actions.
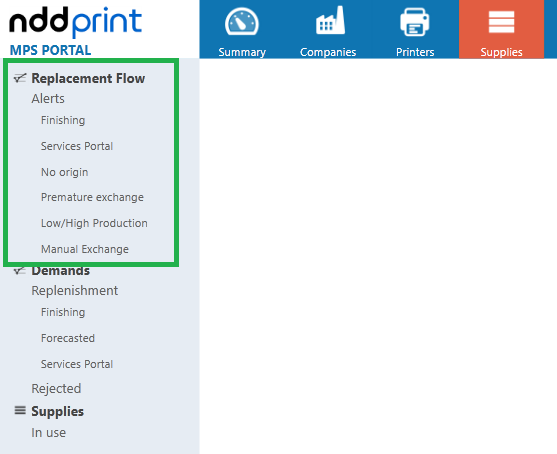
The alerts are located under Supplies > Alerts:
-
Finishing: When a supply is marked as Running Low, it means it will need a replacement soon.
-
Services Portal: This alert only needs to be addressed if any of the provider’s customers are using the Service Portal. It is through this portal that the user will approve or reject requests submitted by users via the Service Portal; if the request is approved, it becomes a demand; if rejected, a message is returned to the user on the Service Portal explaining the reason for the rejection.
-
No Origin: Probably one of the most important alerts in the system, the No Origin grid contains supplies for which the system does not yet know the origin. A supply may remain with an unknown origin for the following reasons:
-
When the system is unable to define the “startup” physical item, which is normally created when the printer is added to the system, this indicates that this material was already present in the printer.
-
When a printer exchange occurred and it was not possible to identify the origin of this exchange in the system (stock), some of the reasons this might happen include, for example, supplies with a part number different from the one in stock.
-
If the Minimum Initial Level for Reliable Exchanges rule is active, and any supply enters the printer with a level below the threshold defined in the rule, a no-origin will be generated to prevent the stock of an item that is not full from being written off.
It is important to note that any and all No Origin alerts that are generated prevent automatic write-offs of stock; for this reason, it is extremely important to address this alert.
Treatment:
Using the Find on Stock button, which will appear after the operator selects the alert they wish to process:
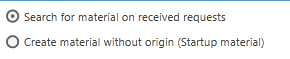
Two treatment options for the alert in question will be displayed:
-
Search for materials on received requests: Supplies currently in stock will be displayed. When using this option, once the origin of a supply is identified, the selected material will be written off from stock.
-
Create material without a origin (startup material): With this option, information will be displayed for supplies that are registered as compatible with the supply/printer model. When you locate the origin of a supply, the system will create a startup item, and the material will not be written off from stock.
Premature Exchange
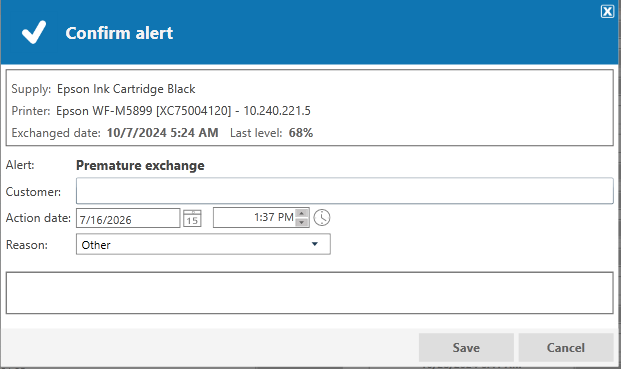
According to the configured rule for Minimum Load for Premature Exchange, alerts will be generated for supplies that are exchanged while they still have a remaining level. This rule is intended to help the provider manage material waste.
Treatment
This alert does not directly impact stock, it serves only as an informational alert for the provider, the action to be taken basically consists of verifying why the supply was exchanged while it was still in stock and confirming the reason; this data can be reviewed later in the Supply Efficiency report.

When you click on confirm, you will be asked to provide the reason for the premature exchange:
Low/High Production
This tab displays a grid containing all supplies that are part of the Replenishment Flow and have a low or high production alert (a value defined through the Configuration Rules) based on the percentage of pages printed by the supply relative to its capacity; these require review by the person in charge.
Similarly, the “Premature Exchange” alert does not directly impact stock; its purpose is to inform the provider which supplies are performing at a very high or very low rate relative to their capacity.
Treatment
The alert can be confirmed by clicking the “Confirm” button to prevent old alerts from remaining on the grid.

Manual exchange
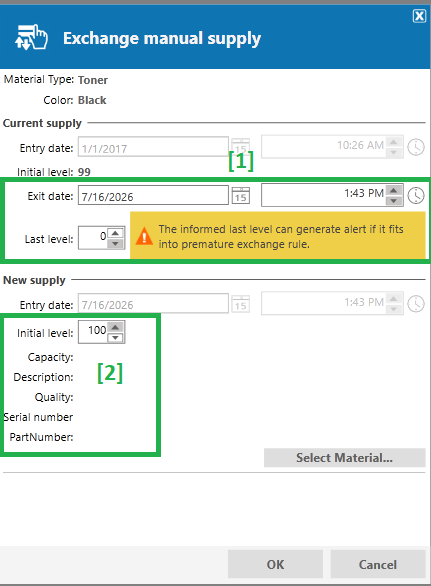
This tab displays the materials that were manually entered into the system and are currently due for exchange. Please note that this applies only to manually entered supplies for which automatic exchanges based on production are disabled.
It is important to note that this guide lists all manual supplies, even if they are not part of the replenishment process.
Treatment
Simply select the Supply you want to exchange, click the Generate Exchange button, and then confirm the Date and Outgoing Shipment, Initial Level, and the Material in stock to be written off:

Frequently Asked Questions
Why didn’t the generated demands appear in Planning?
When this happens, you should check the user’s permissions for demand planning in that specific stock.
An alert for running low on stock was generated, but the material won’t run out for another 6 months. How can this be resolved?
In this case, the supply likely belongs to a machine with low yield; you can customize the alert for that machine by increasing the level of load for that specific printer.
Why aren’t the materials displayed when I click “Generate Orders”?
Check under Suppliers > External Supplier to see if the stock in question has been added as a replenishment item for the supplier in use.
Is it possible to receive orders automatically?
Yes, either through integration or using the Automatic Receipt of Materials rule.
How are replenishment calculations for forecasts performed?
If the supply is a startup supply, the calculations are based on its coverage; after the first exchange, they are based on the printer’s coverage history.
Why, when generating a forecast, is the printer analysis screen not displayed, and the second screen appears directly?
Check your stock configuration settings to ensure that the option Stock replenishes only safety items is not selected.