Requirements
-
Access authorization: Request customer access authorization for the API from NDD
-
Administrator user: You must have a user registered on the portal 360 with master administrator permissions
-
Install the tool SoapUI
How does it work?
Portal 360's APIs follow the SOAP standard. To use them, send a POST request to the Web Service address, including the parameters required by each method, as described in our documentation: Integration Kit
Each Web Service has its own endpoint, depending on the Data Center.
Example (PrintJobsData - DC BR1):
https://api-printjobs.nddprint.com/PrintJobsWS/PrintJobsData.asmx
Running tests in SoapUI
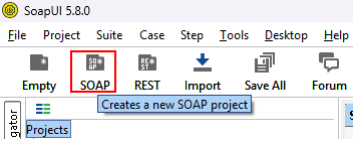
Step 1: Creating a SOAP 1 project
-
Open SoapUI and click SOAP:
-
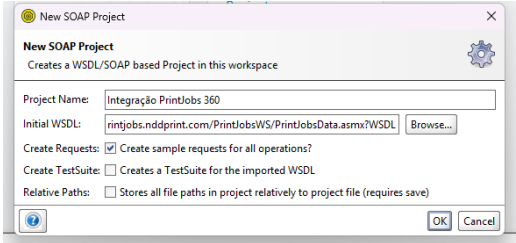
In Project Name, enter the project name
-
In Initial WSDL, enter the Web Service endpoint followed by ?WSDL
Example: https://api-printjobs.nddprint.com/PrintJobsWS/PrintJobsData.asmx?WSDL
-
Check the “Create Requests” option
-
Click “OK”
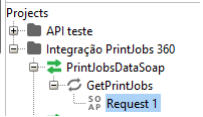
The tool will then generate ready-to-use requests; all you need to do is fill in the parameters.
Step 2: Change the request parameters
-
Access the Request generated by the tool in the created project:
-
Change the data in the tags as shown in the example below:
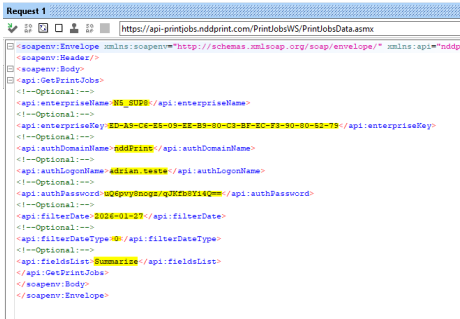
Method parameters:
-
enterpriseName: Company name;
-
enterpriseKey: Company key;
-
authDomainName: Domain name;
-
authLogonName: User logon (administrator);
-
authPassword: Encrypted user password;
-
filterDate: Print job date (yyyy-MM-dd);filterDateType:
-
Date filter type: 0 = print date, 1 = entry date;
-
-
fieldsList: List of fields that will be returned by the function. They must be specified separated by semicolons ‘;’.
-
Example: LogonName;Printer;PagesMono;PagesColor.
-
Note
The user's password must be encrypted using the sample scripts at: Encryption
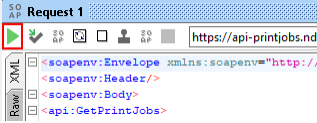
Step 3: Send the request
-
Send the request by clicking the button:
Note
The return value will be a JSON string and must be converted according to the guidelines in the section:Manipulating Returns